Saturday, April 27, 2024

Pinkfresh Studio Cherry Blossom


I purchased the Pinkfresh Studio Cherry Blossom dieset recently. It's been sitting on my desk waiting it's turn. Isn't funny how I HAVE to have a new product yet once it arrives, it can sit for weeks or months just waiting to be used. I wonder what that is called. Not buyer's remorse because I'm happy to have it. Quick to order, slow to use syndrome.

I saw the monthly Pinkfresh Challenge post and decided the colors would work for this beautiful dieset. It's only 2 pieces, the branch is one piece and the flowers and leaves are on a second piece. For the leaves I used some green inked Distress Mixed Media Heavystock (Distress inks in Mowed Lawn, Twisted Citron and Pine Needles). The flowers are cut from scraps of water color paper that I had quick water colored for another card. It's Altenew Watercolors on paper. The yellow centers are cut from regular yellow cardstock scraps as is the sun.

I cut 2 complete sets of the branches and placed them on the panel and cut off the excess. I popped up some of the flowers with foam dots. I like the dimension it gives.

I thought about adding some gems but decided in the end to keep the focus on the beautiful cherry blossom.


Here's a photo of the challenge, the colors are shown below


https://www.pinkfreshstudio.com/blogs/card-making-challenges/april-2024-challenge


Thursday, April 25, 2024

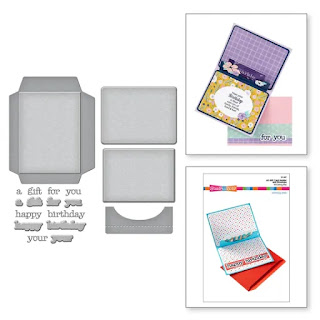
Stampendous A2 Pop-Up Gift Card Holder for Any Age


Today I'm sharing a quick 1 minute video on how I made this Stampendous Gift Card Holder. I made it 2 ways so you could see how it can be for a child or adult just by changing the paper and details. This is a big set, it has 18 cutting dies! It cuts all the panels for the inside and outside of the card, the pop-up gift card holder, an envelope die and 7 words and their shadows. The words are Happy, Birthday, For, You, Gift, Your, A. So you can mix them up and make several sentiments.

For the first example, I used papers from Paper Rose Studio, "Rainbow Twirl". There's some gorgeous paper in this pack. I used the 12x12 sheets. I like to have lots of options. Please note this paper is very popular and may be sold out, I gave a few stores below that may have it.

Here's a photo of the instructions so you can get a better idea how the gift card holder and the envelope are cut out.


The small flowers on the front of the card are from Spellbinders Bold Blooms.


My second card is great for a child. I used paper from the same Paper Rose Studio pack, the papers are  double sided!

I attached a bear from Stampendous' Bear Hugs dieset (there are other Hugs sets if you don't like bears. There's Santa, a dog, a gnome, etc. I glued the feet of the bear onto the backside of the gift card holder. Cute!

I stamped the sentiment from Stampendous Birthday Messages stamp set.


                                                                My YouTube Short!


----  http://shrsl.com/4i72e  [Spellbinders Store]
----  http://shrsl.com/4i72s  [Scrapbookcom]
----  http://shrsl.com/4i72w  [SSS]


----  http://shrsl.com/4i738  [Spellbinders Store]
----  http://shrsl.com/4i744  [Scrapbookcom]
----  http://shrsl.com/4i73t  [SSS]


---- https://shrsl.com/49353 [Scrapbookcom]
                    ---- https://shrsl.com/49359 [Spellbinders]


                                Stampendous Bear Hugs Dieset
----  http://shrsl.com/4i75f  [Spellbinders]
----  https://shrsl.com/4i75v  [Scrapbookcom]
----  http://shrsl.com/4i75n  [SSS]


                        Stampendous Birthday Messages Stamp Set
-----  http://shrsl.com/4i761  [Spellbinders]
----  http://shrsl.com/4i768  [SSS]


Thanks for looking!

Susan

Tuesday, April 23, 2024

Stampendous Sincere Sentiments for Difficult Situations


These are the cards that are the least fun to make. So it's best to keep soe in your stash because most likely you either won't feel like making them as you need them or you will struggle with what is appropriate.

The reason I send so few cards out is because I have a hard time thinking of what to write. So these Stampendous "Sincere Sentiments" are perfect. They are good for the outside of the card or the inside. For those times it's hard to think of what to write, you can stamp one of these lovely messages on the inside and write a short note and it won't look empty.

I took two A2 panels, cut a square out of the center of one to use as a template. I placed the template over the other A2 panel and taped it together with mint tape (low tack tape). I put these into my Misti and put the sentiment stamp inside the square, powdered the panel with an anti static bag, stamped it on the panel and removed the template. I then poured clear embossing powder over the sentiment (be sure there's no stray powder) and heated it.

I then reattached the template to the panel with the mint tape. I used Distress Oxide to ink the square, see below. I let it dry, removed the template, put the panel back into the Misti and positioned the leaf stamp from the set in the corner. I stamped that in black. 

I placed a few gems on the card. These were from my stash, Spellbinders Autumn Seranade Gems, which are no longer available on the Spellbinders site but they have other gems.


My second card uses the same sentiment stamp set, I stamped and embossed it in Copper embossing powder on the beautiful Spellbinders indigo cardstock. For the diecut I used Spellbinders Peony Celebration. I diecut it from copper metallic cardstock (Michaels), rubbed some black acrylic paint over it to dull the shine. I diecut another peony from Spellbinders white glitter cardstock and pieced it back into the negative space. I kept the outline for another card. 

Supplies are listed below with my affiliate links. Using these links help me out at no additional cost to you. Hopefully I inspired you in some way and will use my link. Thanks as always.

                                            Stampendous Sincere Sentiments

----  http://shrsl.com/4i2nf  [Spellbinders Store]
----  http://shrsl.com/4i2nh  [SSS}


                                Peony Celebration Dieset
----  http://shrsl.com/4i2nn  [Spellbinders Store]
----  http://shrsl.com/4i2nt  [SSS]
                        ---- http://shrsl.com/4ghi4 [Scrapbookcom]


                                                Spellbinders Indigo Cardstock


----  http://shrsl.com/4hz30  [Spellbinders Store]
----  http://shrsl.com/4hz35  [Scrapbookcom]


----  http://shrsl.com/4i2og  [Spellbinders Store]
----  http://shrsl.com/4i2ot  [Scrapbookcom]
----  http://shrsl.com/4i2oq  [SSS]


----  http://shrsl.com/4i2od  [Scrapbookcom]
----  http://shrsl.com/4i2og  [SSS]


Thank you for looking! I can be found on Instagram @Susanbcards


Monday, April 22, 2024

Spellbinders Tropical Leaves Press Plates and Die


The Spellbinders Propagation Garden Collection is made up of plants and leaves, plus containers/beakers to hold them. It's a unique and beautiful collection you can see HERE.

Today I'm using the Tropical Leaves Press Plates and Dieset. They are meant to be used with the BetterPress System but I decided to Glimmer hot foil them on vellum. 

I had them for a few weeks and they didn't inspire me. Finally I decided to blend some Distress Oxides on the back of the vellum, I didn't want to dull the gold foil. They looked great, especially when I put them on a white background. Distress Oxides in Spun Sugar, Kitsch Flamingo, Squeezed Lemonade, Mustard Seed, Saltwater Taffy, Ripe Persimmon, Chipped Sapphire, Tumbled Glass, Twisted Citron, Rustic Wilderness.

I embossed white cardstock with the embossing folder from this collection, "Leafy Helix". The sentiment is also from this collection, a set of stamps and matching dies.

The cardstock is a pretty dark pink textured cardstock from Sizzix.


SUPPLIES ARE LISTED BELOW WITH DIRECT LINKS TO STORES.

See the entire collection here:
----  http://shrsl.com/4i11m  [Scrapbookcom]
----  http://shrsl.com/4i11f  [SSS]
----  http://shrsl.com/4i112  [Spellbinders]


----  http://shrsl.com/4i10n  [Spellbinders]
----  http://shrsl.com/4i10l   [Scrapbookcom]
----  http://shrsl.com/4i10y  [SSS]


----  http://shrsl.com/4i117  [Spellbinders]
----   http://shrsl.com/4i11a  [Scrapbookcom]
----  http://shrsl.com/4i11f  [SSS]


----  https://shrsl.com/4i11n   [Spellbinders]
----  http://shrsl.com/4i11q  [Scrapbookcom]
----  http://shrsl.com/4i11f  [SSS}


Sizzix Making Essentials Cardstock Sheets
----  http://shrsl.com/4i11r  [Scrapbookcom]


----  http://shrsl.com/4hk2e  [Spellbinders Store]
----  http://shrsl.com/4hk3g  [Scrapbookcom]


Thank you for looking!

Susan


Sunday, April 21, 2024

Such Intricate Embossing I Fooled Myself


I posted this card on Instagram and when I wrote the details, I thought I had used the Glimmer Hot Foil System to get that gold metallic image. I had made this card a while back and didn't remember that I had used the BetterPress System on it. Look at all the lines in the peony, they are very thin and very close together. It's very hard to use embossing powder and get that kind of detail. 

I used VersaMark ink pad on my press plates, so when I used the BetterPress on it, the ink was pushed into the cardstock. I then used an anti static powder bag on my navy cardstock, poured the Brutus Monroe Gilded embossing powder onto the image. This is my favorite embossing powder. I've never had a finer embossing powder. It's ground down so it's super fine, and produces the cleanest image. Sometimes you use an embossing powder and it's so thick that it distorts the sentiment or image. This doesn't, don't just take my word for it, it's the favorite embossing powder of many. Look at that level of detail!

The cardstock is a dream. I purchased it from Spellbinders, it's their Indigo cardstock, 100 lb. I wasn't gifted this paper, I purchased it because it's very hard to find a dark navy cardstock, which is a nice alternative to black. I bought it after seeing some cards Yana Smakula made. She is known to use some very dark backgrounds on her cards, so beautiful.

This set comes with some sentiments but I used the Cheers to You sentiment set because I wanted it to stand out from the panel. This set is one piece, I used the same embossing ink and embossing powder. There is a matching die in the set so you can ink and diecut all the sentiments in one swoop. My favorite is to make these and have ready to go sentiments on hand.

I inked the edge of the panel wih Versamark and the same embossing powder to her that gilded edge, no matt!

I adhered it to an A2 card, that's it. Listed below are the supplies with direct links to the stores. Using my links are helpful to me at NO additional cost to you. Thank you!

SUPPLIES:

----  http://shrsl.com/4hz2g  [Spellbinders Store]
----  http://shrsl.com/4hz2i  [Scrapbookcom]
----  http://shrsl.com/4hz2k  [SimonSaysStamp]


----  http://shrsl.com/4hz2n   [Spellbinders Store}
----  http://shrsl.com/4hz2v  [Scrapbookcom]
----  http://shrsl.com/4hz2z  [SSS}


 Entire Spellbinders April 2024 Release Here


----  http://shrsl.com/4hz30  [Spellbinders Store]
----  http://shrsl.com/4hz35  [Scrapbookcom]


----  http://shrsl.com/4hz37  [Scrapbookcom]
----  http://shrsl.com/4hz39  [SSS]
----  http://shrsl.com/4hz3a  [Brutus Monroe Store]

----  http://shrsl.com/4hz3e  [Scrapbookcom]
----  http://shrsl.com/4hz3f  [SSS]
----  http://shrsl.com/4hz3g  [Spellbinders Store]

----  http://shrsl.com/4hz3i  [Spellbinders Store]
----  http://shrsl.com/4hz3n   [Scrapbookcom]
----  http://shrsl.com/4hz3o  {SSS}


Thanks for looking!
Susan


Saturday, April 20, 2024

Gorgeous Rainbow Gradient Cardstock 3 ways!


I received Box 7 from Your Paper Insider, the subscription paper store. They ship 4 surprise boxes a year, currently it costs $29.95 (Shipping IS Included!). This Rainbow Gradient Foil Cardstock stopped me in my tracks! I had to drop everything to use it. I made 3 cards from this 8.5x11" sheet. Luckily it's available in a 10 pack now here!


For my first card, I embossed it with a Simon Says Stamp Exotic Vines embossing folder and Spellbinders dies. All the supplies are listed below.


I wanted to see if I could Glimmer hot foil this cardstock. Glimmer hot foil likes smooth surfaces, this worked great. I used black hot foil and a Spellbinders plate.


The final card is embossed with an Altenew embossing folder. Oh, so pretty!


Supplies listed below with affiliate links that will take you to the stores that sell this product. Using my link will give me a small commission at no additional charge to you. This helps me to continue providing tutorials and content.


            Your Paper Insider Rainbow Gradient Cardstock

----  http://shrsl.com/4hyaz  [Your Paper Insider]


----  http://shrsl.com/4hybi  [SSS exclusive]


----  http://shrsl.com/4hybo  [Spellbinders Store]
---- http://shrsl.com/4hybw  [SSS] 
----  http://shrsl.com/4hybz  [Scrapbookcom]

----  http://shrsl.com/4fodn  [Spellbinders Store]
----  http://shrsl.com/4hyc6  [SSS]
----  http://shrsl.com/4hyc8  [Scrapbookcom]


----  https://shrsl.com/4e749 [Scrapbookcom]


That's all for today, thanks for looking! I post several times a week on Instagram @Susanbcards


Friday, April 19, 2024

Grundgy Goodness, Old and New


I can't stop using the Tim Holtz Sizzix "Vault World Travel". It's such a great image and I love all the extras in the set, the plane, arrow and the alphabet. 

The background is old, I think I made it 4 years ago after watching a Tim Holtz demo. The only reason I didn't use it was because I made 2 and posted a card with it. Enough time has passed to make it new again, LOL. In the demo Tim had shown how to used Distress Texture Paste, stencil and palette knife. Apply the paste with the knife and then tap the top of the paste through the stencil, creating uneven texture. It's a small thing but really adds to the interest.

After it dried, I sprayed Distress Spray Stains and Oxides. I used, as I can best recall Distress Oxide Spray in Speckled Egg, and Distress Spray Stain in Peacock Feathers. I addedd a bit of water to move it around. After it dried, I applied some gold gilding polish with my finger to the arrows. You could substitute acrylic paint if you want. After that dried, I sprayed Ground Espresso and Gathered Twigs Spray Stain over everything, not too much, misting it with water.


I diecut the World Traveler globe from kraft cardstock. I randomly addded some Sizzix Creamy Acrylic Paint to the globe diecut with my finger (always). To give it a patina, I used some Distress Paints in Speckled Egg, Mermaid Lagoon and Peacock Feathers, not too much as you can see from the photo. The water diecut is cut from Sizzix Revealz Sandable Cardstock. I used a Sizzix sanding block to reveal the light blue color underneath. This is a pretty cool paper, not white core not solid core, it's actually a different color inside, a lighter shade of blue.

I didn't end up using the green piece, it's in my stash!

The next photo is to show the ridiculous scraps I can't let go of but I was happy I had to diecut the word GO wiht the alphabet dies included in the set.


That's it for today, listed below are the supplies I used with affiliate links. If I inspired you to purchase any of these products, using my links give me a small commission at NO additional charge to you. It lets the companies and me know you like these tutorials. Thank you if you choose to do so.

Thanks for looking!


----  http://shrsl.com/4hwzx  [Scrapbookcom]
----  http://shrsl.com/4hx00  [SSS]

----  http://shrsl.com/4hx0h  [SSS]


----  http://shrsl.com/4hx0m  [Scrapbookcom]
----  http://shrsl.com/4hx0r  [SSS]


----  http://shrsl.com/4hx0v  [Scrapbookcom]
----  http://shrsl.com/4hx12  [[SSS]

   
----  http://shrsl.com/4hx17  [Scrapbookcom]

----  http://shrsl.com/4hx22  [Scrapbookcom}


----  http://shrsl.com/4hx2g  [Scrapbookcom]
----  http://shrsl.com/4hx2d  [SSS]