Friday, September 24, 2021

Altenew Card and Envelope


The current Time Out Challenges is "In joy or sadness, flowers are our constant friends." sponsored by Altenew. https://timeoutchallenges.blogspot.com/ 
When I saw the sponsor I knew I could use some new products I just ordered. Making a thankful card is in joy of friendships, so often we send people we love flowers, both for joyful and sad occasions.
I've been using a lot of metallic paper for holiday cards and have a ton of scraps. I looked at this "Itty Bitty Flowers" die set and was going to use traditional floral colors for the blossoms but then thought, why not use all those itty bitty scraps? I cut the branch out of black cardstock but cut each layer of flower out of different metallic scraps. The set comes with a layering guide and I'll be honest it's a bit difficult to figure out which shapes go with which. Lucky that I really like putting together dies while watching YouTube! 

I was really pleased with how it came out, and just wanted to attach it to a white background. I usually think some kind of texture is important, so I chose the "Blooming Branches" 3D embossing folder by Altenew, which resembles the branch. I cut the square panel down. I cut a frame from some copper metallic paper I bought at Michaels, using 2 rectangle dies to make a frame. The white card I used is 5"x6.5" and too big to use the square folder for embossing, so I diecut more of the branches and just glued them around the panel. I popped up the panel and diecut "Thankful", an old Simon Says Stamp die, and now it looks perfect for Thanksgiving.
I didn't have an envelope to fit this card so I made one. I saw that this week's SSS blog challenge for Wednesday is "Card + Matching Envelope". I wanted to emboss the envelope but it's really hard to get it to fit properly, so I just cut to fit a piece for the front and attached it and a thin strip of copper paper, leaving room for the "To" area on the envelope. I think it looks pretty special.

Here's the 2 Altenew products I used for the card and envelope.

Thanks for visiting!
I'm also on Instagram @susanbcards


Wednesday, September 22, 2021

Tim Holtz/Sizzix Retro Oven with a Retro Recipe

This "Retro Oven" by Tim Holtz/Sizzix is right up my alley. I like to bake and I know so many memories are wrapped up in baking with family. My sisters and I used to get together and make all different types of cookies at Christmastime and package them up and bring them to work or give them to friends. At some point we just went to one type of cookie and our kids would get together and help make the cookies.

This retro oven is cut from Distress Heavystock Mixed Media Paper, my favorite for spraying and inking. I wanted the old Avocado Green appliance, I'm pretty sure we had when I was little. I used my current favorite colors, Peeled Paint and Crush Olive Distress Spray Stain. I just sprayed and misted with water to get this speckled, uneven look. 

The cute cookie shapes are included in the set, I just cut those from scraps. The wallpaper is also a random printed paper scrap, always happy to use up the scraps! "Baked with love" is a sentiment from a Lawn Fawn set with the same name. Isn't the font cute?

I added some stitching on the bottom, just something new I'm trying with my old, barely used sewing machine. My stitching isn't the greatest, but I'm trying!

I have an old cookbook of my MIL's, the book is old and the pages are falling out. One page had this PB cookie recipe, underlined and starred in red. I remember my FIL loved PB cookies, so I thought maybe she marked it. I cut it out and attached it to the back of this tag so it wouldn't get lost. We have peanut allergies in my family, so I don't make PB cookies but it's still a nice reminder of people.

I originally posted this tag on Instagram @susanbcards but my photo was taken before I added the stitching. I wanted to enter the SSS Monday Challenge which is "Stitch It". I thought the zig zag stitch added a nice retro feel, so I added it and forgot to take an updated photo and posted an old photo.

Have a good day.


Tuesday, September 21, 2021

Altenew "Blossoming Branch" Aged Faux Metal Card


It's like opening a gift when I run a 3D embossing folder through my Big Shot. Here I used Altenew's "Blossoming Branch" folder. The dimension a 3D folder makes is amazing, especially when using metallic cardstock. 


This is the cardstock I use from Michaels
 (purchased last year)
Altenew prints the name of the folder on the front so it's easy to tell which end is up.

You could stop here if you like a shiny piece, but I like to age it.

This is what I use: Black acrylic paint, a foam brush, Tim Holtz mister bottle, a paper towel. I have all these ready because you need to go fast with a small amount of paint applied (see how much is on my mat? That's more than enough.) I use a mister because my paper towel is barely damp, too much water will just make a mess. Plus I like the brush strokes just a little paint and damp towel make.
Quickly apply a thin coat of paint with the foam brush.

Quickly wipe away paint, leaving some in nooks & crannies.


I like the brushstrokes of going in 2 directions.

That's it. I then just made a 5 1/2" x 5 1/2" card out of black cardstock and cut down my panel so it left a small border. Pretty dramatic for such a simple technique. I learned this from a Tim Holtz YouTube demo (I'm pretty sure it was the one on Distress Paints).

Thanks for reading! I'm on Instagram nearly everyday as Susanbcards.


Wednesday, September 15, 2021

Guest Designer for The Funkie Junkie Boutique Blog!


Hello! I am so happy to have been asked to be the Guest Designer (first time ever) for the current challenge, "Creating Die-na-mite". This is the perfect challenge for me, using dies in a project!

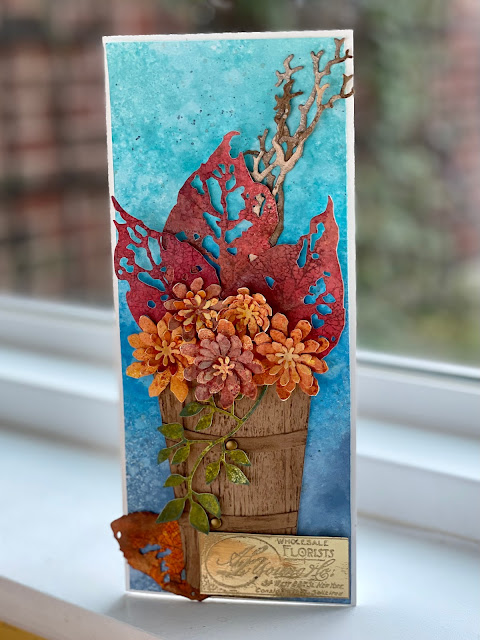
I love the new Sizzix Tim Holtz Chapter 3 dies, "Leaf Fragment" and "Potted 2". The leaves are supposed to look a bit weathered. I wanted my project to look like one of those fall potted arrangements you'd see on a doorstep. 

I took a piece of Distress Mixed Media Heavystock paper and cut it to 8 1/2" x 3 1/2", inked it up in Distress Sprays Stains, light to dark misting with water, drying in between colors, trying to avoid them all mixing together. 


To make the pot, I diecut a piece of kraft cardstock with the
Potted 2 die. Next, I took the Tim Holtz "Lumber Folder" (an oldie), inked the raised side of the folder with Ground Espresso Distress ink. I placed the pot diecut into the folder and ran it through the Big Shot to get the woodgrain texture. I added a few brass brads.


The gold label is made from shiny gold cardstock, stamped the ad from Tim Holtz "Dearly Departed" stamps and gold heat embossed it. 


I always have sheets of paper that I have sprayed and inked on hand so I can just diecut whatever I need. Here I had some paper in some dark shades of red and orange (Crackling Campfire, Barn Door, Aged Mahogany, Spiced Pumpkin) and a spritz or two of Jack o Lantern Distress Mica Stain (get it while you can!) I then took the Tim Holtz "Pressed Foliage" stamps and using Ground Espresso Archival ink, I pressed veins onto the leaves.


The flowers are made from an old set by Sizzix Tim Holtz "Small Tattered Florals" that I gave dimension to using a shaping tool.


Lots of different steps but if you already have some inked up paper, it goes much faster. I always keep any extra diecuts from projects in a box, so I had the branches and the ivy already made. I try not to waste. I had a piece of cardboard from a box and diecut another Potted 2 from it, and used that to pop up my woodgrain pot. No other pop dots or foam were needed to give the project dimension, since I added it with the shaping tool!

I love this card, it has so many interesting details but you can also do a simpler version without the shaping or stamping and it would still be beautiful. Hopefully you can takeaway a few ideas from this card.


Thank you to the design team at The Funkie Junkie Boutique Blog for asking me to guest design!

Here is a link to their blog and my Guest Designer blog post!   

https://frillyandfunkie.blogspot.com/2021/09/guest-designer-susan-babcock.html

And while you are there, enter the challenge, you could win a $25 gift card to The Funkie Junkie Boutique! 

Thank you for visiting!

I can also be found on Instagram @susanbcards where I often post new cards.


Monday, September 13, 2021

Stunning Snowflake die and Engraved embossing folder with Mica Stain Spray


These are Sizzix/Tim Holtz products from last year (2020), I just received the new Distress Mica Stain Sprays, this is Winterberry, a medium shimmery pink. 

I took the Sizzix/Tim Holtz "Engraved" 3D embossing foler and rubbed the top inside with "Spun Sugar" Distress Oxide. How do you know which side is the top? In the bottom corner it says "Tim Holtz Sizzix". You rub the ink pad all over the inside of the top, put a piece of cardstock inside and run it through the Big Shot. When you take the paper out, the ink will have been pushed into the recessed areas of the paper.


 Next I took a piece of Ranger/Tim Holtz Mixed Media Heavystock paper in white and cut it down to fit the Sizzix/Tim Holtz the larger die in the Stunning Snowflake set. I sprayed the paper with the Winterberry Distress Mica Stain. You can diecut first, spray second, but I think it's easier to get even coverage by just spraying the paper first. I diecut the smaller piece from white heavy cardstock, 110 lb. I didn't use the Mixed Media paper since I wasn't going to spray it with color. After diecutting the paper I used some Stickles in "Diamond" (I've had this forever, not even sure they still make it) and covered the white smaller piece for shine.

I ended up cutting another of the larger die again in regular pink cardstock just to layer it under the Mica sprayed piece for dimension.

I thought the layer could use a pink mat around it, and decided to cut another piece of white cardstock slightly larger and sprayed just the edge with the Winterberry Mica Stain. 

I attached a piece of gold thread to make it look like an ornament and taped the thread to the back of the Engraved panel and sandwiched the thread between that panel and the mat. I thought that was a bit nicer, if the recipient wants to keep the snowflake, it can easily be removed as it's not glued onto the panel, just the thread is holding it in place.

I couldn't decide if I should put a small sentiment onto the snowflake or just leave it as is, if you look at my Instagram post you'll see a few pics where I was trying to decide what looked best. You decide.

That's it for today.

If you want to see my Instagram account where I post many more cards, I'm Susanbcards on Instagram.

Thanks for looking!

Friday, September 10, 2021

Sizzix/Tim Holtz Oak Leaf Impresslit


I wanted to use the new Sizzix Chapter 3 Tim Holtz 3D Oak Leaf Impresslit. The Impresslit cuts the shape and embosses the texture in one pass!
I inked up some Distress Mixed Media Heavystock paper using a combination of Distress Sprays, in the new Mica Stains in Flickering Candle and Jack o Lantern and the Oxides in Mustard Seed and Carved Pumpkin. I also inked up some browns and Rusty Hinge on some other sheets for some brown leaves. Using a Distress Ink cube in Gathered Twigs, I lightly ran it over the diecut leaves to highlight the veining.


I cut another piece of the Mixed Media Heavystock to 8 x 3 1/2 inches for a slimline card panel. I used yellows, oranges and a little browns- Distress inks and Distress Oxide Sprays on the panel.
 (NO MICAS YET).
I let this fully dry.

Next, I took stamps from my stash, Tim Holtz's "Pressed Foliage" and using a stamp platform and Distress Ground Espresso ink, I stamped the leaves onto the panel. The stamps have intricate veining so I inked it up a few times to be sure I got the detail. I quickly took clear embossing powder and poured it over the leaves while the ink was still wet and heat embossed it. 
 I wanted the stamped ink to be trapped under the clear powder so when I added more color or water it wouldn't wash away. Some of the powder stuck and some didn't when I tapped it off, and I had already removed the stamps from the platform so there was no way to restamp.
I took a paintbrush and added a little bit of the Spiced Pumpkin Distress ink to the stamped leaves just to darken them and have them stand out a bit. I wanted to add a bit of shine from the Distress Mica Sprays, so I spritzed a little more and added some water. Since the Distress ink is water reactive and the embossing powder didn't completely cover the stamped leaves, the ink washed out a bit, which I ended up liking in the end. 
I then took the script stamp from Tim Holtz's Poinsettia stamp set and randomly stamped it in Ground Espresso Archival ink just for some interest.

I wound some gold thread around the panel, glued 3 of the Oak leaves together, then using pop dots attached it. 

The sentiment is from Tim Holtz's Tiny Text.

I used some gold metallic paper to mat it, and attached it to a kraft cardstock card I made.


I hope you like it, I think it's important to use old products with new, the possibilities are endless.


You can find me on Instagram @susanbcards, where I post a new card almost daily.


Thursday, September 9, 2021

Cut Out Leaves- Die cut and Dry Embossed


I love this Sizzix/Tim Holtz "Cut Out Leaves" die set. It only cuts out the leaf pattern inside the leaf, it doesn't cut the outer edge of the leaf, so just the design is cut. I had this idea to die cut just some of the leaves and emboss the dies on the rest of the card.
I first diecut the 4 leaves in the center of 3 1/2" x 7 1/4" white 110 lb panel. I then placed the dies onto the panel so it would look like falling leaves. This time I put the Sizzix Silicone Rubber Pad under the cardstock but still use the regular cutting plates and the Multi Purpose Platform set for embossing. This silicone rubber pad acts as a cushion, letting the dies emboss the paper rather than cut the paper. Don't worry, the silcone pad doesn't get die cut as long as you use these Thin lit dies. You just can't use the silcone pad with BIGZ dies, which are made to cut chipboard, etc. Don't ask me how I know this, just know that this is my second silicone pad.
You really want to diecut first, emboss second because if you do it the other way around, the 2nd time you put it through the Big Shot it will smash the embossed leaves down and they will look flat, not as good.

I then cut a 2nd panel for underneath the die cut panel so I could add color to the diecuts. I cut it slightly smaller so I wouldn't have to worry about the edges sticking out anywhere. Here are the colors and order I sprayed them, drying them in between, eliminating too much blending.


I happen to have the purple diecut Thanks (Altenew) on my desk, originally for another project. I liked the fall/Thanksgiving vibe it gave. I don't usually use a sentiment in a color that isn't already on my project but I liked the contrast and just pulled it all together by matting the panel in purple.

That's my card. I like the look of the diecuts and embossing. I hope you try it and tag me on Instagram if you post it.

@susanbcards on Instagram, I post almost everyday with a new card.


A Welcoming Halloween Garden

The "Gate Keeper" dies from Sizzix/Tim Holtz are Halloween dies but I think they can be used year round. So when I cut out the gates in black, my initial thought was an entrance to a garden. It reminded me of a garden in Boston or London behind wrought iron fences. 
I started with a piece of Distress Mixed Media Heavy Stock paper which I cut to 4 1/4 x 5 1/2. I used Distress Sprays in Faded Jeans (both regular and Oxide) and dried the paper. I then decided to add some shimmer by spraying the new Mica Stain Spray in Empty Tomb and the Distress Spray Stain in Brushed Pewter. That gave it a hazy, mystical look to the panel. I die cut the moon and after adding a bit of Gathered Twigs to the edges, I thought it needed the bat.
That set the stage for me adding all the flowers and greenery. I have a box of leftover diecuts from other projects that I'm so happy to use on any new projects. Once I started adding them they looked like they were waiting at the gate, a bit spooky. The card needed a sentiment to finish it off, I have a package of Idea-ology Halloween Baseboards and thought "The Dead of Night" was the perfect sentiment. All of a sudden the card went from a happy garden to a cemetery entrance.


 I don't make many Halloween cards, I love Halloween, we decorate the outside of the house, but people don't generally send Halloween cards. But this card is so fun I'll probably just add it to my inspiration board.

Enjoy the season, the rest of the year is the best time for making cards! 

Follow me on Instagram @susanbcards where I post new cards almost daily.

Saturday, September 4, 2021

Eroded Metallic Leaf Fragments

The Sizzix/Tim Holtz "Leaf Fragments" die is the star of the show here. I took a piece of Distress Mixed Media Heavy Stock paper and Distress Paints and followed Tim Holtz's YouTube demo for his Eroded Metallic technique. I saw it 2x, I think once was for the Distress Paint demo, the other time for the Salvaged Patina color reveal. It's hard to explain, much easier to watch the demo, but here's the steps in a nutshell: cover the paper with Distress Paint shades that would mimic patina (mostly greens and blues), let it dry. Then take Antique Bronze Distress Paint and quickly cover the dried paint. Splatter water on top of the paint, some areas with no water, some with more, some with less. Using a heat tool, set the dry areas a bit. Take a paper towel and quickly press into the paper, peel off. Some of the Bronze paint will be pulled off, some with stay, looking like eroded metal.


I die cut the leaf, then gold heat embossed the Choose to Shine sentiment from Tiny Text. I ran a little Black Soot Distress Crayon over the sentiment to make it stand out.
I used the Tim Holtz Shaping tools to give the leaf a bit of dimension.

 The background is cream cardstock run embossed with the Sizzix/Tim Holtz 3D Foliage folder. I took an embossing pad and lightly ran it over the paper, hitting the raised areas, poured gold embossing powder over the entire front and tapped off the excess and heated it. 

I didn't have a sheet of evergreen cardstock to mat the panel so I ink blended the edge of the mat with Rustic Wilderness Distress Ink, I think the color is perfect with the gold and brings out the bit of green on the leaf.

I popped up the leaf with pop dots, cut to fit. I think the dimension from the shaping tools really make a big difference. The extra details make a card special.

I think this card is perfect for a (my) college student heading back to in person class after a year studying remotely.

I'm entering this card into 'De-stress with distressing' challenge on the Funkie Junkie Boutique Challenge.  http://frillyandfunkie.blogspot.com/

I hope you like my card, have a wonderful day.

If you want to see more of my work, I post nearly daily @susanbcards on Instagram.