Saturday, September 17, 2022

Gift Card Holder Card Using Sizzix Halloween Toppers


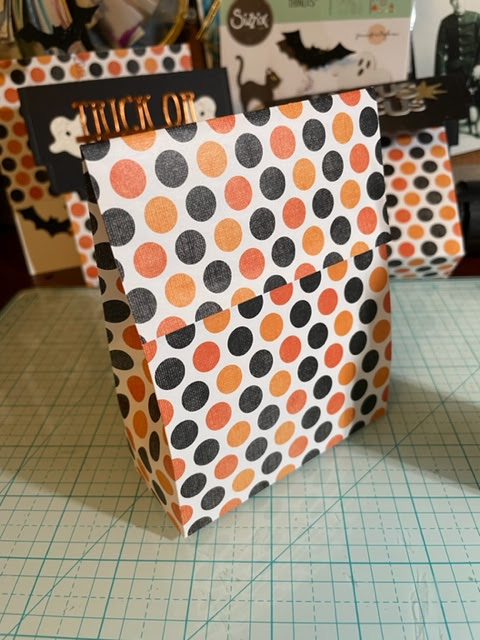
I think it's important to think of different ways to use the dies I have. I think the Sizzix Halloween Topper set is great, the sentiments included in the set are perfect for not only treat toppers but also Halloween cards but I wanted more from it than just treat toppers. I thought the topper looked like a gift card holder, that were the idea for this card came from.


This is what the card looks like opened. The polka dot paper is a pocket, when opened, the gift card holder pulls up out of the pocket and shows the gift card inside. In the video, I had used a glue dot to hold the gift card in place. I think if I had cut the polka dot paper a bit shorter, the holder would have fallen open. Next time.
The card base is 5.5" x 11", scored on the 11" side at 5.5". Fold on the score line. This is a square card.


This is the slider piece. It is 5' x 5.5", scored on the 5.5" side at 1 inch. This piece will hold the orange topper/gift card and slide up when opened. Fold on the score line.
On the left is the square card base. The right is the slider piece, folded, red double sided tape is on the 1 inch scored piece. Red tape is the strongest adhesive, great for making bags, boxes, too.
Take off the red tape covering, line the card up to fit inside the base, put the top of the slider piece all the way into the fold of the card base, close the card and the slider piece will attach to the card and move up and down when the card is opened and closed.


It should look like this when attached to the card.

I die cut the Sizzix Halloween Treat Topper from orange cardstock. I attached it to the top of the slider piece.


This piece is the pocket, I covered it with the polka dot paper. It is a piece of cardstock cut to 3 3/4" x 6 1/4". I probably should have cut it a smidge shorter than 3 3/4" so the topper would fall open. On the 6 1/4" side I score it at 1/2" and 5 3/4". Fold on these score lines. I then cut the polka dot paper to fit the front of the pocket.

I put red tape on the side tabs, line it up so the bottom of the slider piece can fit inside it. this pocket attaches to the bottom of the card base. The slider piece should move up and down when opened and closed.


I then attached all the sentiments to the front and inside of the card. 

In an earlier post I showed how I made the treat toppers for treat bags. 

Thanks for looking! I'm on Instragram @susanbcards

Susan


Thursday, September 15, 2022

Spellbinders' Christmas Flea Market Finds by Cathe Holden Patchwork Card


This is what remains after making the paper bowl I shared yesterday, A link to the entire collection is HERE. Two of the sides fit on 1 piece of the loverly Spellbinder's paper called "Home for the Holidays" by Cathe Holden. I couldn't throw it away so I made a patchwork card. I cut the paper in strips using a paper trimmer, each was somewhere between 1/4" and 1/2" inch, it looks better if there's some variation.

My finished card is 5 1/2" x 5 1/2" square. So I cut the red mat a bit smaller at 5 1/4" x  5 1/4", and the card base at 5' x 5"(see the white piece above.) I used the score board to draw a line in the center at
 2 1/2" going both ways to find the center. It doesn't matter if you score it or draw it, it's all covered in the end.

The bird is a square piece of ephemera from Cathe Holden's "Jingle Bells Miscellany Printed Die Cuts" also available at Spellbinders" shop. Using corners of the ephemera, I lined up the corners to find the center point for the bird. I used wet glue, some people put double-sided adhesive over the entire sheet.

After the bird was placed I took 4 of the blue strips and placed them around the bird. Then I continued to lay down the strips one printed strip at a time, going around the paper. I trimmed off the excess as I went so I could reuse the scraps.


Here are the last few pieces I placed, just a few triangle pieces at the end. I die cut "Merry Christmas from the same red paper as the mat, 3x and stacked them for dimension. I put a bit of Distress Collage Medium and Rock Candy on top for a snowy look.

The second card shown is just using a sheet from the same pad, a piece of ephemera that says Merry Christmas and a bell I had in my stash, tied on with twine. Super easy but still festive!


Here are the products I used, with affiliate links below. I get a small % of the sale, at no cost to you. Thank you for using it if you decide to buy anything. 


Wednesday, September 14, 2022

Spellbinders "Vintage Handcrafted Hexagon Base and Side Bowl" by Cathe Holden


Hello! Today I'm sharing Spellbinders' Vintage Handcrafted Hexagon Base and Side Bowl. It's from the new release, Christmas Flea Market Finds by Cathe Holden. When I saw this die set, I knew I had to have it. This is the coolest thing I ever made out of paper! The die set consists of 2 dies. You cut 1 base and 6 sides.

This is a vintage craft called a card bowl. People would reuse greeting cards, using templates cut them and punch holes for the stitches. Spellbinders has made it easy by making the dies with the holes! Using yarn (or any thread that can fit into the holes) you can crochet the bowl together like I did or hand sew it together.

Blanket stitch sewing it would be easier but I liked the way the package photo looked. I know basic crochet but never made anything, so I googled "how to stitch together a card bowl" on YouTube. I only found one where they showed how to crochet it. I followed the directions but it didn't look good, the spacing was for their template. So trial and error, I finally got the look I wanted.

Instead of cards, I used the beautful paper in this release called "Home for the Holidays". This is a 6"x 9" pad, 12 designs, 24 sheets in the pad. You can cut 2 sides from each sheet. I cut one scene print, one pattern print and one piece of scrap cardstock for each side. I sandwiched the cardstock between the 2 prints and glued it all together. I added the cardstock to make it sturdier. The paper is copy weight and I wanted to insert the hook 3x in the same hole without ripping it. If you end up using greeting cards you won't need the cardstock.

The crochet hook I used is a "B-2.25 mm" I also used a yarn needle and fine weight yarn in a cream color. I brought the die with me to the store to be sure everything would fit through the hole.

I made a video on how to crochet this bowl together, here's a written explanation. Each panel is crocheted around the edge. Insert the hook, and make an anchor stitch, chain one. Insert the hook back into the same hole and single crochet, repeat inserting the hook into the same hole 3x. Then move on to the next hole and repeat.

For the corner holes, insert the hook, single crochet, chain stitch TWO times, reinsert the hook into the same hole, single crochet, chain stitch ONE time, repeat.

Continue on around the panel. When you complete the final hole, insert the hook into the anchor hole, make a slip stitch. Wrap the yarn around the hook, pull it through the loop, cut the yarn. Pull this tail throught he loop and tug.

Crochet all the sides and base. Attach all the panels to the base using the yarn needle and same yarn. I just sewed them together, hiding the stitches as best as I could. When all the panels are attached to the base, sew up the sides. That's it.


I can imagine making these bowls and filling them with wrapped treats for holiday gifts. You could use photos for the sides. Or cut the sides from cardstock and have a child draw pictures on them for a sweet grandparent's gift. I'm one of those people who save greeting cards from people, I thought of cutting the card fronts and the inside messages for a rememberance of a special birthday or a wedding.

And don't throw away all the paper scraps! Here's a card I made using scraps. The bird is ephemera from the "Jingle Bells Miscellany Printed Die Cuts" set. The sentiment die is Spellbinders' "Christmas Mix and Match Sentiments".

I covered treat boxes with the paper and made these stamped tags!

 
Here's what I used (clickable images)


See the entire Cathe Holden Flea Market Finds HERE.
There are some beautiful floral papers from an earlier release that would make a gorgeous bowl!


Any purchases made using my links will let me know you liked my ideas at no additional cost to you. Thank you!


Monday, September 5, 2022

Sizzix Halloween Treat Toppers!


I'm honored to have been asked to participate in Sizzix's Halloween Spooktacular Takeover Week!
I made these Halloween Toppers and attached them to handmade bags. The bag template came from a free sample box from Target. I ripped apart the box and measured it, perfect for these treat toppers.


Here's what is included in the topper set. In addition to the topper die, theres a ghost, bat, wand, 2 stars/flash and Boo! Hocus Pocus! and Trick or Treat. The sentiments can be used on cards too. I'll post some cards on Instagram this week.


I used some printed 12x12" Halloween Paper, I bought it by the sheet at Hobby Lobby, I think it was on sale for around 40 cents each. 

I cut it down to 8.5 x 11.5"  (note it's 11.5 not 11). Score at 1/2",       4 1/2", 6 1/8" and 10" on the long side (11.5" side). 

Turn the paper to the short side (8.5") and score at 1 1/2" and 6 3/4". Fold at all the score lines. It should look like this:


Cut along the score lines so your paper looks like this:

Apply glue or red tape to the 1/2" tab to connect the box at the side..


Glue the bottom of the box like this: I use a ruler to press the tabs together from the inside, since my hand won't fit.


Here's the flap, it folds over the front. Fill with treats, pinch the sides to help it close. You can glue the flap down or clip it.


If you'd like to see how I made the toppers, I posted a Reel on Instagram @susanbcards

Here's the link for Sizzix Chapter 3!


You can get 10% off ALL Chapter 3 (includes Tim Holtz Chap 3!) using the discount code SUSAN10 at the Sizzix site here.