Saturday, June 29, 2019

Flowers in a Planter Box


For Valentine's Day I made a folding mailbox with love letters popping out of it. When I saw a wooden planter with flowers popping out of it on Pinterest, I knew I could use the mailbox as a pattern.

I used a piece of kraft cardstock, cut to 3.5" x 10.5"
Score on the longside at 2.5", 5", 7.5", and 10".

For the box inserts, (2) pieces of cardstock cut to 3/4" x 3.5"
Score on the longside at 1/2" and 3"
Fold at each score line.

I took a mini cube of Distress ink in Ground Espresso and dragged it over the kraft cardstock, at some points pulling it back to make it look like woodgrain.
I used a ruler to add lines (every 1/2 inch) with a marker to make it look like wood planks.


I then took a rectangle die and taped it to the bottom of the paper to make "legs". I ran it through on each side and at the top. See 1st photo. After diecutting, I applied glue to the 1/2" tab to form the box.

I then cut various leaves and flowers using Sizzix/Tim Holtz "Garden Greens" and Funky Floral #3. I stamped and fussy cut a small butterfly. I glued all these pieces onto the Box Insert pieces and attached to the inside of the box.
This box fits into an envelope!
I hope this explanation is clear...I'm new to this. Leave a message for me if you try it! Thanks!

Monday, June 24, 2019

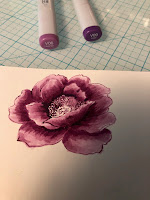
Coloring Altenew Wallpaper Art

I really love this stamp set. I decided to use purple today, inked it up in 2 ways. The first time I pressed the stamp into the ink and stamped it on watercolor paper. I thought the outline looked a bit dark but decided to use it anyway. I put some distress ink on my glass mat and sprayed a bit of water on it to use it like watercolors. 


I tried 2nd generation stamping to get a lighter outline and painted again.

I used Copic Markers to add some detail, starting inward and moving out for petal shape.
I usedthe darkest purple shade to add depth   


Saturday, June 22, 2019

Altenew Wallpaper Art


I won the Altenew Instagram blog hop for a $15 giftcard. I bought this gorgeous Wallpaper Art Stamp. I forgot how nice their stamps are, great quality. I love this image, decided to do the 30 day color challenge a lot of cardmakers on Instagram are taking part in. This took a awhile, I used Polychromos colored pencils at first and then decided I liked the look of coloring over that with a very light Copic. It added a bit of depth.


I originally was going to just matt this onto a red card but then I dropped my marker and made a little mark on the paper which drove me crazy so I decided to fussy cut this image and glue it onto an embossed piece of paper I had on my desk. It forced me to work a little harder;) Also note, I used the backside of the embossed paper, I liked the recessed side better for this.

Altenew Wallpaper Art Stamps
Crafter's Companion Embossing Folder (I don't know the name)
Copic Marker R81 Rose Pink
Faber Castell Polychromos pencils (36 piece set)


Sunday, June 16, 2019

Gerbera Daisy Card

I bought this Simon Says Stamp background stamp and really use it as a focal point not as a background. So I’m challenging myself to use this in different ways. I stamped it with Memento ink using my trusty Tim Holtz stamping platform. The stamp is large so I want to be sure I get all of it on the cardstock. Nothing worse than missing an area.
After I stamped it I colored it with Polychromos pencils and smoothed out the color with Gamsol. The white dots were added with a white opaque marker by Recollections, I love the chalky look of this marker. A bit of Wink of Stella on the leaves I colored was added. I fussy cut the edge of the stamp and cut it to fit a 5x6.5 card after gluing it to a blue panel. 
I keep a bunch of scraps in a file drawer in my desk so I can try out different background colors, handy to organize by color. 

Friday, June 14, 2019

A Simple Card for a Beautiful Day

A simple card today because it's beautiful outside and my desk looks like this:
It always starts out neat, but then my mind goes a mile a minute and this is what happens and I can't find anything. So I'm going to clean it up and put away some cards I completed. And then go outside because it's a beautiful day.
This was the inspiration for the card, a $3 dish from Target. Simple and to the point. I think the card could have used a light wash of watercolors or a frame around the leaf, but today is a good day for quick.

Thursday, June 13, 2019

Contemporary Wedding Card

I needed a wedding card for my friend’s daughter who is getting married. She’s a girly girl but modern. So I used the Simon Says Stamp Center Cut Heart Stamp and a square 5x5” gold shimmer card. I used white pigment dye so I could be sure I didn’t miss any of the details, then heat embossed with white embossing powder.
I write the color names on the lid so I can easily pull the one I need from a drawer. I stamped the heart on pink card stock and heat embossed and cut it out so I could add a little color to the gold card. Die cut the letters with CZ Designs Archie in both fun foam and card stock glued them together to add dimension. I used Wink of Stella on the white letter so it would shimmer like the gold letters. Added a few pearls. That’s it! Isn’t a square card so special?


Wednesday, June 12, 2019

Dies and Alcohol inks

I love playing with alcohol inks. I had this pretty piece of Yupo paper that I randomly place some alcohol ink on, and I thought I'd just place this die cut over it for a random look. I don't like random.
So I placed the die under a blank Yupo paper so I could see where I wanted the color to go. It worked pretty well. 
But the truth is, I like exact. So I used more alcohol inks on Yupo and die cut it and pieced it together like stained glass.
Ranger pearl alcohol inks: Splendor, Raspberry, Deception, Alchemy, Sublime, and Tranquil. Regular alcohol ink: Red Pepper, Mermaid, Stream, and Indigo. Plus Ranger Blending Solution. Legion Yupo paper 5”x7”