Tuesday, June 25, 2024

Spellbinders Out and About Collection and a Distress Spray Background


Today I used Distress Sprays to create the background.
I have a YouTube video here:


For both cards, I used Distress HeavyStock paper, sprayed Distress Oxide Sprays in Rustic Wilderness and Speckled Egg. Use just a little of these because Distress Oxides will give the entire project a milky, oxidized look. To get clear colors, use more Distress Spray Stain. I used several colors of the regular Distress Spray Stains in:
Peeled Paint, Unchartered Mariner, Salvaged Patina, Peacock Feathers, Rusty Hinge, Vintage Photo and Mustard Seed. Wow, that's a lot. I dried the panel in between layers.

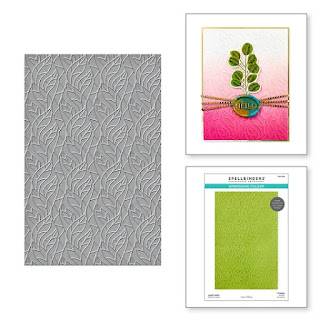
After the panel is dry, I placed it into the Leafy Helix embossing folder. I rubbed the Ground Espresso Archival ink pad onto the raised side of the the folder, so the brown ink would be pushed into the paper. After running it through the diecutting machine, I poured clear embossing powder over the panel and heat set it. This leaves a nice clear shine.

I diecut and colored the pieces of the Spellbinders Mushroom Mansion and Garden Buddies diesets, and colored the with Distress inks. I popped up the mushroom and the gnome and bird with foam tape.


Below are the supplies with direct links to the products. Using these links let the stores know you find my content useful and will continue to allow me to share my cards. Thank you to those who use my links.


                                        Supplies: 


----  http://shrsl.com/4l5sn  [Spellbinders]


---- http://shrsl.com/4l5sx  [Spellbinders] 


Leafy Helix Embossing Folder


----  http://shrsl.com/4l6o7  [Spellbinders]
---- http://shrsl.com/4l6od  [Scrapbookcom] 
----  http://shrsl.com/4l6oh  [SSS]


---  http://shrsl.com/4l0mm  [Spellbinders] 
---  http://shrsl.com/4l0xh  [SSS]


----  http://shrsl.com/4l5t2  [Scrapbookcom]


----  http://shrsl.com/4l5t7  [Scrapbookcom]


Thank you for visiting! I can be found on 
Instagram @Susanbcards where I post several times a week.


Monday, June 24, 2024

Spellbinders Love Note Bird and Lindys Magicals


The new Spellbinders Scout mini diecutting machine is out! They also released a special collection of dies that can fit in the Scout called, "Out and About" see it all here.. This is another dieset from the collection, called "Love Note Bird". I placed it on an A2 card so you can see there's nothing mini about it.

I made some Lindys Magicals backgrounds a few weeks ago. I love the splashes of pretty colors on this one. I diecut the pieces from this set from solid cardstock, using the Scrapbookcom Sunshine paper pad, full of bright, summery colors.

I decided I wanted to have something for the bird to sit on, so I used some gold cardstock and the Arch Labels and Tags dieset. This is a handy nesting die sets so you can put 2 together and make a frame. Now it looks like my bird is sitting on a perch. 

The sentiment is from The sentiment is from the Better Press "Cheers to You" sentiment strip set. I always keep a bag of ready to go sentiments.

I used some clear Wink of Stella on the bird and some Glossy Accents in the center of  the flowers.

Supplies are listed below with clickable links. Using these links lets the companies and me know you find this content useful or inspiring. Many thanks if you choose to do so.

----  http://shrsl.com/4l0mx  [Spellbinders]
----  http://shrsl.com/4l0ub  [Scrapbookcom]
----  http://shrsl.com/4l0w0  [SSS]


----  http://shrsl.com/4l4hn  [Spellbinders]

----  http://shrsl.com/4l4hu  [Spellbinders]
----  http://shrsl.com/4l4hy  [Scrapbookcom]
----  http://shrsl.com/4l4hv  [SSS]


----  http://shrsl.com/4l24n  [Scrapbookcom]


----  http://shrsl.com/4l0t1  [Spellbinders]
----  http://shrsl.com/4hz2v  [Scrapbookcom]
----  http://shrsl.com/4hz2z  [SSS}

Clickable store links below:


Thank you for looking! I can be found on Instagram @Susanbcards

Saturday, June 22, 2024

The Spellbinders Rainbow Slice Tunnel


The Spellbinders "Rainbow Slice Tunnel" is a dieset that has 4 pieces that cut out the "slice" into the paper, add 4 layers for the most impact. You can also use the pieces it cuts out for another project. This is one set from the "Tunnel Scapes" collection. You can see the entire collection HERE. I really like the Underwater Tunnel and Marine Life sets, I don't have those but they are cute!

For my project, I decided to go a bit dramatic. I have the Scrapbookcom "Sunshine" cardstock pad, it has a lot of fun bright colors. The good thing about using a paper pad like this is you can be sure the colors all look good together, they are just the right tone.
I used that paper to cut out the layers and flowers and set it against black cardstock for the most eye catching look.

I only popped up one of the layers, the black one. I cut a black fun foam (from Michael's about $1 in the kid's section) to just a smidge smaller than A2. I don't want the foam to show. I placed the black cardstock over the fun foam and lined up the Tunnel Slice die on it so it would be in the same place and then ran it through the diecutting machine. With scissors, I cut a smidge off foam where the slice is cut so it wouldn't peek out of the top cardstock.

I diecut the flowers from the colored scraps of the tunnel slices and glued them down. I used foam dots to pop up a few flowers. 

That's it for today! The supplies are listed below. I'd appreciate it if you use my links for any purchases. I receive a small commission at no additional cost to you. It will help me continue provide content. Thank you!

SUPPLIES:

----  http://shrsl.com/4l24c  [Spellbinders]
----  http://shrsl.com/4l24r  [Scrapbookcom]
----  http://shrsl.com/4l252  [Simon Says Stamp]

----  http://shrsl.com/4l24n  [Scrapbookcom]

----  http://shrsl.com/4l256   [Scrapbookcom]

Thanks for looking! I can be found on


Friday, June 21, 2024

Shaped Cards Using the Spellbinders Out and About Collection


You've probably heard about the new Spellbinders "Scout" mini diecutting machine (if not click the highlighted text to learn more.)

The "Out and About" Collection can all be diecut in the new mini machine, see it all here

I did some partial diecutting to cut these shaped cards, using the "Scallop Labels and Tag" dieset. I took and A2 sized card and placed the die over the card, letting the left cutting edge hang over the fold of the card. I then put the top cutting plate to the right of the fold so it wouldn't cut the left edge and leave the card fold.

I used some Distress Oxide Ink in Spun Sugar for the pink card and Broken China on the blue card, lightly inking the edge all the way around the card. I diecut all the flowers and leaves from white cardstock and used Distress ink to color all the pieces (including the hello sentiment).


For the blue card, I put some Shady Lunar Paste onto black cardstock with a foam blending tool, then diecut the watering can. For the handle and spout on the watering can I used Golden Hour Solar Paste. I put some Spellbinders self adhesive Capri Blue gems onto the spout, just a pretty little detail. These gems come in lots of colors and each package includes 4 different sized gems.

The sentiment is from the Better Press "Cheers to You" sentiment strip, I foiled it in silver.


SUPPLIES with clickable links to the store. Using these links let the companies and me know you find my content helpful. 

Lilac Scout only available at Spellbinders Store
Pink Scout only available at Scrapbookcom

----  http://shrsl.com/4l0mx  [Spellbinders]
----  http://shrsl.com/4l0ub  [Scrapbookcom]
----  http://shrsl.com/4l0w0  [SSS]


----  http://shrsl.com/4l0mk  [Spellbinders]
----  http://shrsl.com/4l0xh  [SSS]


----  http://shrsl.com/4l0mp  [Spellbinders]
----  http://shrsl.com/4l0xh  [SSS]


----  http://shrsl.com/4l0mm  [Spellbinders] 
---  http://shrsl.com/4l0xh  [SSS]


----  http://shrsl.com/4kkkf  [Spellbinders]
----  http://shrsl.com/4l0wi  [Scrapbookcom]
---- http://shrsl.com/4l0wn  [SSS] 


----  http://shrsl.com/4l0ql  [Spellbinders]
---- http://shrsl.com/4c7ff [Scrapbookcom]
----  http://shrsl.com/4l0xb  [SSS]
----  http://shrsl.com/4l0ri  [Spellbinders]
---- https://shrsl.com/4934k [Scrapbookcom]
----  http://shrsl.com/4l0s6  [Spellbinders]
----  http://shrsl.com/4l0v1  [Scrapbookcom]
----  http://shrsl.com/4l0vf  [SSS}

----  http://shrsl.com/4l0t1  [Spellbinders]
----  http://shrsl.com/4hz2v  [Scrapbookcom]
----  http://shrsl.com/4hz2z  [SSS}


Thank you for looking! I can be found on Instagram @Susanbcards


Wednesday, June 19, 2024

Spellbinders Peony Butterfly Wax Seal


Sometimes it's hard to get the wax seal just right. I think I've found the key to a good wax seal. It takes about 4 wax beads to get enough wax down to press the entire seal. I found if you add 1 more bead, it's easier to pour. I think 4 1/2 beads is about right, which means there's a bit left over in the spoon.

I used gold wax here and then built my card around the Spellbinders "Peony Butterfly" wax seal. I wanted a background that had pattern but not something distracting. This "Leafy Helix" embossing folder seemed just right. I embossed white cardstock, cut out the center with a rectangle die. I placed a piece of gold cardstock behind it and popped up the panel. 

The white stems are from "Autumn Sealed Sprigs", an older set, all these tall stems work well with wax seals. There are other long stems from Spellbinders which work equally as well.

That's it for today, supplies are linked below.

SUPPLIES:

----  http://shrsl.com/4kx70  [Spellbinders]
----  http://shrsl.com/4kx71  [Scrapbookcom]

----  http://shrsl.com/4kx79  [Spellbinders}
----  http://shrsl.com/4kx7g  [Scrapbookcom]


----  http://shrsl.com/4kx7j  [Spellbinders}
----  http://shrsl.com/4kx7v  [Scrapbookcom]

----  http://shrsl.com/4kx84  [Spellbinders}
----  http://shrsl.com/4kx88  [Scrapbookcom]


----  http://shrsl.com/4kx6l  [Spellbinders]
----  http://shrsl.com/4kx6u  [Scrapbookcom]


Thanks for looking!

Susan


Monday, June 17, 2024

Stencil, Ink and Shine for Water


I don't use stencils very much, I'm not sure why. They make backgrounds and coloring fast. Plus you can apply other media besides just ink. I decided to use glitter paste on one card and the other I used Deco Foil on the other.

Below is my YouTube video tutorial:


Supplies with direct links at no additional cost to you. If you use my link it lets companies and me know you find my content helpful. Thank you!


----  http://shrsl.com/4ku1c  [Scrapbookcom]
----  http://shrsl.com/4ku1e  [Simon Says Stamp]


Sizzix Stencil & Stamp Tool Gray (pink only at Scrapbookcom)


---- http://shrsl.com/4kue6  [Scrapbookcom]
----  http://shrsl.com/4kuea  [Simon Says Stamp]


----  http://shrsl.com/4ku1o  [Scrapbookcom]


----  http://shrsl.com/4ku21  [Scrapbookcom]
----  http://shrsl.com/4ku25  [Simon Says Stamp]


----  http://shrsl.com/4ku2c   [Simon Says Stamp]


----  http://shrsl.com/4ku2i  [Scrapbookcom]
----  http://shrsl.com/4ku2h  [Simon Says Stamp]


Mint Tape (only at Scrapbookcom0
----  http://shrsl.com/4kuee  [Scrapbookcom]


Stick & Stamp Mat (SSS & Brutus Monroe version)

----  http://shrsl.com/4kueg  [Simon Says Stamp]


----  http://shrsl.com/4ku2j  [Scrapbookcom]
----  http://shrsl.com/4ku2k  [Simon Says Stamp]

----  http://shrsl.com/4ku2m   [Scrapbookcom]
---- http://shrsl.com/4ku2s   [Simon Says Stamp]
----  http://shrsl.com/4ku2x  [Brutus Monroe]


----  http://shrsl.com/4ku3b   [Scrapbookcom]
----  http://shrsl.com/4ku32  [Simon Says Stamp]
----  http://shrsl.com/4ku3i  [Brutus Monroe]

----  http://shrsl.com/4ku3p  [Scrapbookcom]
----  http://shrsl.com/4ku3s  [Simon Says Stamp]
----  http://shrsl.com/4ku3k  [Brutus Monroe]


Click on the image below to go to the store:


Thank you for visiting! 

I can be found on Instagram @Susanbcards where I post several times a week!