Sunday, June 16, 2024

Diecuts with Patterned Paper!


Who doesn't have a stash of pretty patterned papers? I definitely have scaled back the buying of these papers but once in a while I come across one that I have to buy. This paper with the postage stamps was so pretty and with the postal dies being all the rage right now, I decided to buy it from 12x12Cardstockshop. Unfortunately, it's sold out but I did find it elsewhere, linked below in the supply list.

The other paper is very old, by Momenta and for sure is out of print but lots of companies make this watercolor look paper, or you can make it yourself. The flower is Altenew's Pink Star Tulip. You don't always have to used solid cardstock for dies, or color it yourself. A good image is a good image.

The postal shape die is by Hero Arts, a set of nesting dies I've had forever, a good basic. The stamping is from an old PaperTrey set, Vintage PostageVintage Postage. Sometimes I have to pull out the oldies.

SUPPLIES all with clickable links below the photos or click on the photo. Using my links helps me out at no cost to you, so thank you!


----  http://shrsl.com/4ktml  [Scrapbookcom]

----  http://shrsl.com/4ktmq  [Scrapbookcom]


----  http://shrsl.com/4ktmu  [Simon Says Stamp}


----  http://shrsl.com/4ktn4  [Scrapbookcom]


----  http://shrsl.com/4ktn6  [Scrapbookcom]

Similar paper to the one I used on the flower:


---- http://shrsl.com/4ktng  [Scrapbookcom] 


QR code to 12x12ScrapbookCardstockShop:


Click on the stores below:


Wednesday, June 12, 2024

Spellbinders Tunnel Scapes Collection


June is a great month for the Spellbinders release, check it out HERE.


Today I used the Spellbinders Tunnel Scapes Collection. There's a series of dies that cut out shapes to look like clouds, a pond or just a trail. I have the clouds and I used it with the Perched Birds and Fly Away sets. Check out the products below under SUPPLIES.

For both backgrounds, I used Distress Mica Sprays. Unfortunately it's difficult to see in a photo, but each have a pretty shine. I also added some Spellbinders Capri Blue Essential Gems. 

I do like that the elements that go inside the clouds are small, so I use random scraps from my stash to diecut. The small clouds are made from white glitter cardstock, the moon & clouds from silver glitter cardstock, and the airplane is cut from irredescent cardstock. I used some foam to pop up the panels and some of the diecuts.

That's it for today, easy! 


SUPPLIES listed with clicable links. If you use my link, I receive a small commission for sharing my ideas. It lets me know you'd like me to contiune sharing my cards.

Click HERE to see the entire Tunnel Scapes Collection.

                                    Tunnel Clouds Dieset


----  http://shrsl.com/4kok7  [Spellbinders Store]
----  http://shrsl.com/4l5rb  [Scrapbookcom]


----  http://shrsl.com/4koke  [Spellbinders Store]
----  http://shrsl.com/4l5rj [Scrapbookcom]


----  http://shrsl.com/4kokn  [Spellbinders Store]
----  http://shrsl.com/4l5r5  [Scrapbookcom]


----  http://shrsl.com/4kokx  [Spellbinders Store]
----  http://shrsl.com/4l5r8  [Scrapbookcom]


I can be found on Instagram @Susanbcards where I post several times a week.


My YouTube channel can be found HERE.


Tuesday, June 11, 2024

Spellbinders "Fair Winds" Collection


Cardmakers are always looking for masculine card ideas, or cards that could go to either men or women. 

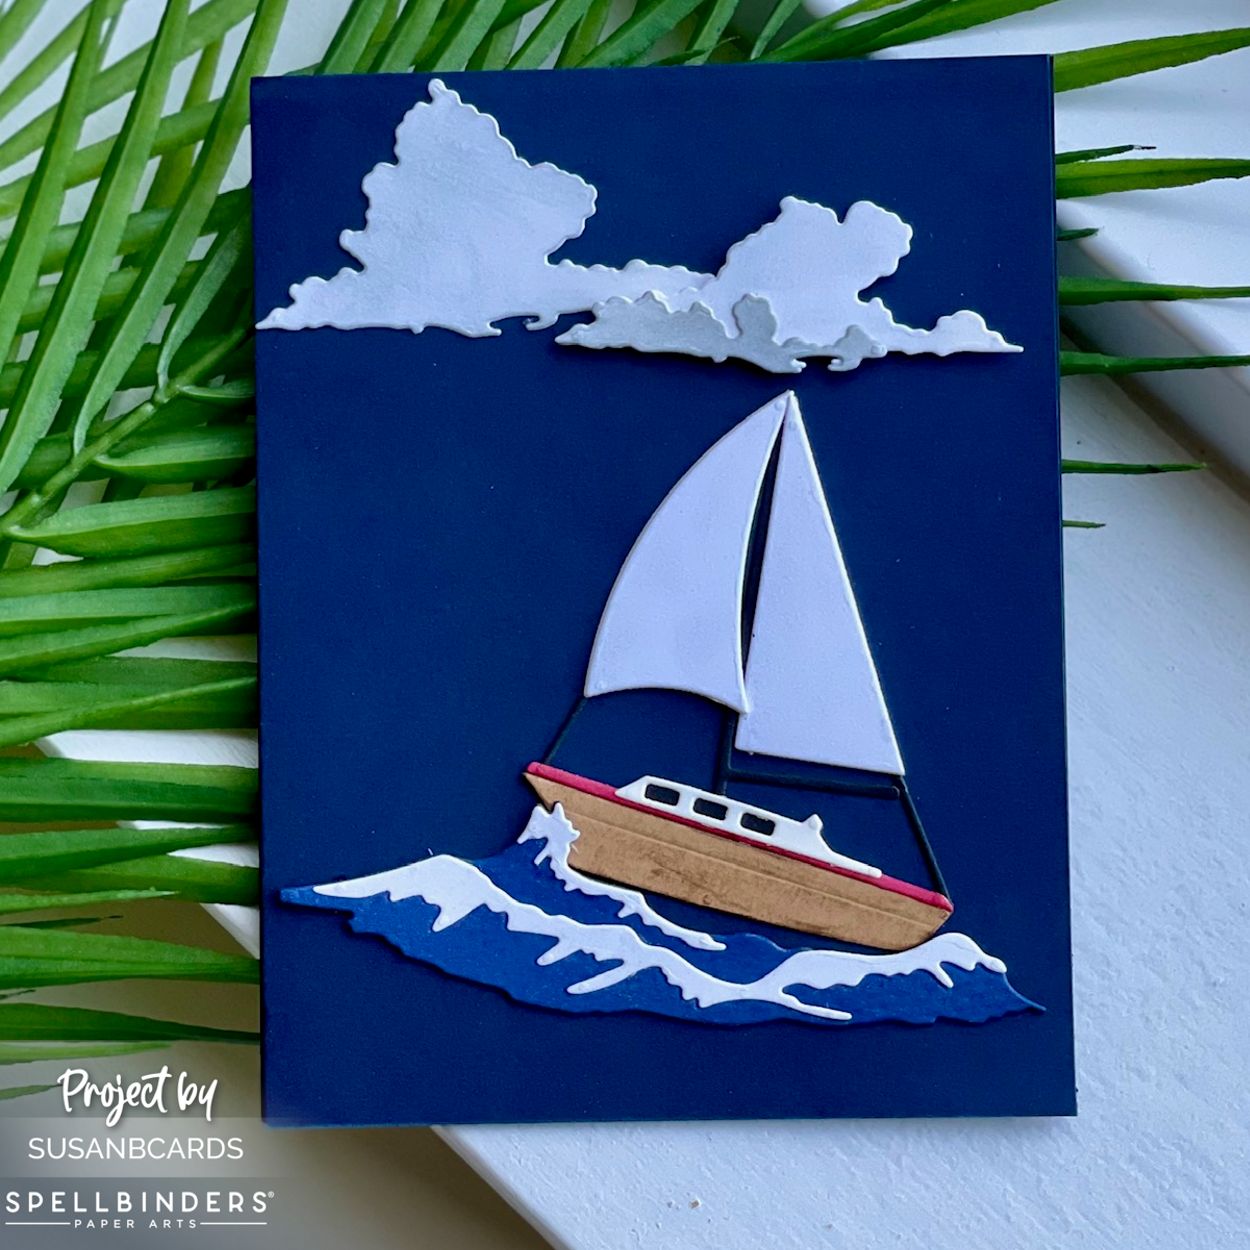
The Spellbinders "Fair Winds" Collection is just the perfect set. Although it's perfect for that boat loving person in your life, it's really a great symbol for so many things. Bon Voyage, New Adventures-retirement, graduation. I also think it would make a great Father's Day card, parenthood is truly rough sailing sometimes.

This wasn't my intended card, I was filming a video for another card, a much more serene scene. I wanted to show all the pieces in the set, I wasn't using the wave. I diecut the waves and just showed it with the sailboat and realized what a great scene it could make on dark cardstock. And no blending was necessary, I wanted the boat to be the star of the show.

The Spellbinders Essential Cardstock is one of my favorites. It's thick and beautiful. I was inspired by Yana Smakula, she often uses very dark colored cardstock on her cards, often Spellbinders cardstock. It's very hard to find a very dark navy, this one really sets the mood. Everything else is diecut from scraps in my stash.

The only inking I did was on the brown part of the boat and a bit on the clouds. I took a Distress mini ink cube (Gathered Twigs) and just lightly ran the edge of the pad over the kraft cardstock to look like wood grain. For the clouds I put a little Hickory Smoke ink on a blending tool and colored a bit of the white clouds to look stormy.


Here's my original serene scene card, very different! More to come on this later.


That's it!


Supplies with clickable direct links to stores. Using my link when you make a purchase provides me a small commission at no extra charge to you. If I've inspired you in any way, this helps me continue providing tutorials and content. Thank you!

If you'd like to see the entire Spellbinders "Fair Winds Collection by Dawn Woleslagle" click HERE.


                                    Spellbinders Set Sail Dies
----  http://shrsl.com/4km1f  [Spellbinders Store]


----  http://shrsl.com/4km1q  [Spellbinders Store}


----  http://shrsl.com/4km1x  [Spellbinders Store]


I can be found on Instagram @Susanbcards 
and YouTube:  http://www.youtube.com/@susanbcards


Monday, June 10, 2024

Spellbinders 3D Emboss & Cut and Gelli Plate


The Spellbinders Floral For You 3D Emboss & Cut embossing folder includes 3 dies that fit INSIDE the embossing folder so that you can emboss and cut in 1 swoop. It didn't fit through my Sizzix machine, so I had to do it in 2 steps, emboss the use the die alone to cut out the shape. Same outcome, but extra steps but you can do it in 1 pass if you have the Spellbinders machine.

Of course I decided to ink my embossing folder before running it through my machine. But for whatever reason, the ink beaded up all over the paper. So I went back to my old tried and true technique of inking a gel plate, a brayer to blend the colors, then pressing the embossing folder onto the gel plate. If you want to see my YouTube tutorial on this:


I pulled the print from the gel plate, it was kinda cool.

Supplies are listed below with direct links to the products. Thanks for using my links, it lets the stores know you find my content inspiring or helpful. It also encourages me to continue this journey. I appreciate the support. If you make a purchase using my link, let me know and I'd be happy to send you a thank you note. You can message me on Instagram @Susanbcards (click on my name and it'll take you there.)

SUPPLIES:

See the entire Spellbinders Sealed 3D Botanical Collection: Click HERE!


----  http://shrsl.com/4kkkf  [Spellbinders]


Scallop Labels and Tag Dies


----  http://shrsl.com/4kkkf  [Spellbinders]
----  http://shrsl.com/4l0wi  [Scrapbookcom]
----  http://shrsl.com/4l0wn  [SSS}


(link to all the colors available)
(link is to all the colors available)

----  http://shrsl.com/4kkla  [Spellbinders]


----  http://shrsl.com/4kkkv  [Simon Says Stamp}


----  http://shrsl.com/4kkkz  [Simon Says Stamp]


Click on the image below to go to the Spellbinders Store!


Thank you for looking!


Friday, June 7, 2024

Lindy's Magicals and Sizzix Under the Sea 3D Embossing Folder


Recently, I made a card using Sizzix's Under the Sea Embossing Folder, Lindy's Magicals and the "Ocean Critters" (Lobster). You can see it below. It was for Scrapbooking Made Simple's YouTube channel, they are selling some Sizzix products in a bundle, if you are interested, please visit their store, Scrapbookingmadesimple.com while supplies last.


I liked it so much, I made another one using the "Sizzix Ocean Medley" (Crab). For both I used Lindy's Magicals on Distress Heavystock paper and embossed it with the Sizzix "Under the Sea embossing folder, this time I filmed it, you can see the video on YouTube, or click below.

For both cards, I randomly placed colors of Lindy's Magicals on the paper, sprayed it with water and water with Perfect Pearls. I let the ink move around and cover the panel, dried it with a heat gun and then let it completely dry on it's own. I inked both with a Hero Arts Mermaid Ombre ink pad, and then clear embossed it.

Please see the video for all the details.


I diecut both sets using Sizzix Summer Colors cardstock. The papers in this pad were perfect for the water scene. I added Wink of Stella to the diecuts for extra shine. 

That's it, thanks for watching! The supplies are listed below with direct links. If you use my link to make a purchase, I receive a small commission at no extra cost to you. I hope you find my content informative and inspirational.

SUPPLIES:


----  http://shrsl.com/4kh4i  [Scrapbookcom]


Sizzix Ocean Medley Dieset


----  http://shrsl.com/4kh4o  [Scrapbookcom]


----  http://shrsl.com/4kh4u  [Scrapbookcom]


----  http://shrsl.com/4jaer  [Scrapbookcom]


----  http://shrsl.com/4kh5l  [Scrapbookcom]


The Lindy's Magicals I used are "Under the Boardwalk" I purchased on Amazon, I don't have a link for them.

The Sizzix Summer Colors Cardstock can be found on Scrapbookingmadesimple.com


Thanks so much for looking! I can be found on Instagram @Susanbcards


Thursday, June 6, 2024

Spellbinders June Stitching Die of the Month


June is here and the Spellbinders Stitching Die of the MonthSpellbinders Stitching Die of the Month is Ice Cream! I decided to make this a fun card, perfect to celebrate the end of the school year. 

I used Spellbinders Glitter Cardstock for a bit of bling, I just happened to have sprinkle embellishments in my stash (a few years ago from Hobby Lobby). Oh my, I have too much stuff. I used gold thread on the ice cream cone too just to take it all over the top.

That's it for now, here's the supply list with links to the products:


----  http://shrsl.com/4kf99  [Spellbinders]


----  http://shrsl.com/4kf9f  [Spellbinders]

That's it for now, go get an ice cream cone!


Saturday, June 1, 2024

Pink Star Tulip Ink Blended


I love this Altenew Pink Star Tulip, a few weeks ago I messy painted it. I have a YouTube short showing how I quickly did this. This time I decided to try my hand at ink blending the already die cut pieces. 

I googled Pink Star Tulip to see what colors they come in. The top one is in Spun Sugar, Squeezed Lemonade, Picked Raspberry, Dried Marigold and a bit of Wilted Violet Distress Oxide Inks. I used Neenah Solar White Smooth Cardstock Neenah Solar White Smooth Cardstock.

For the background, I used Distress Inks (Mowed Lawn, Twisted Citron, Rustic Wilderness, and Pine Needles) on white Scrapbookcom Mixed Media paper, dipping and drying. I added a bit of Lindy's Magicals on top and sprayed it with water and Perfect Pearls. After it was dry I embossed it with the Farmhouse Florals embossing folder.

For the next card, I used Altenew Crisp Dye Inks (link in the supplies below).  The embossed panel is one from my stash, I ink blended some Distress Oxide Inks (Spun Sugar, Scattered Straw and Salvaged Patina) on a gel plate, pressed the Whimsical Bouquet embossing folder onto the plate and embossed the white paper.


Direct Links to the supplies used. If you use a link to make a purchase, I receive a small commission at no extra cost to you. It lets the stores and me know that you find these tutorials useful.

SUPPLIES


----  http://shrsl.com/4l6lm  [Scrapbookcom]


----  http://shrsl.com/4l6lp  [Scrapbookcom]


----  http://shrsl.com/4l6m1  [Scrapbookcom]


----  http://shrsl.com/4l6lw  [Scrapbookcom]


----  http://shrsl.com/4iji8  [Scrapbookcom]


Thanks for looking! I post several times a week on