Monday, September 5, 2022

Sizzix Halloween Treat Toppers!


I'm honored to have been asked to participate in Sizzix's Halloween Spooktacular Takeover Week!
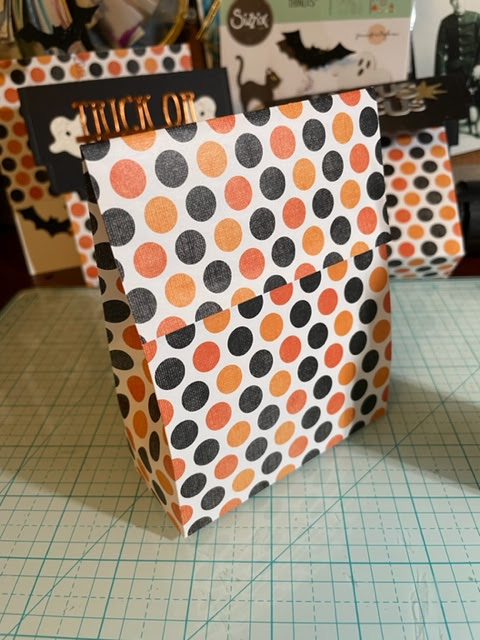
I made these Halloween Toppers and attached them to handmade bags. The bag template came from a free sample box from Target. I ripped apart the box and measured it, perfect for these treat toppers.


Here's what is included in the topper set. In addition to the topper die, theres a ghost, bat, wand, 2 stars/flash and Boo! Hocus Pocus! and Trick or Treat. The sentiments can be used on cards too. I'll post some cards on Instagram this week.


I used some printed 12x12" Halloween Paper, I bought it by the sheet at Hobby Lobby, I think it was on sale for around 40 cents each. 

I cut it down to 8.5 x 11.5"  (note it's 11.5 not 11). Score at 1/2",       4 1/2", 6 1/8" and 10" on the long side (11.5" side). 

Turn the paper to the short side (8.5") and score at 1 1/2" and 6 3/4". Fold at all the score lines. It should look like this:


Cut along the score lines so your paper looks like this:

Apply glue or red tape to the 1/2" tab to connect the box at the side..


Glue the bottom of the box like this: I use a ruler to press the tabs together from the inside, since my hand won't fit.


Here's the flap, it folds over the front. Fill with treats, pinch the sides to help it close. You can glue the flap down or clip it.


If you'd like to see how I made the toppers, I posted a Reel on Instagram @susanbcards

Here's the link for Sizzix Chapter 3!


You can get 10% off ALL Chapter 3 (includes Tim Holtz Chap 3!) using the discount code SUSAN10 at the Sizzix site here.


Friday, September 2, 2022

Simon Says Stamp STAMPtember Blog Party!


Hello!  Today I'm participating in a blog PARTY for Simon Says Stamp's STAMPtember! It's the 13th anniversary of STAMPtember, a month long celebration. Stop by the Simon Says Stamp blog for all the details of exclusive products and collaborations with some of our favorite companies!

I was sent this stamp set called "Sassy Thankful".  A clever, funny. Thanksgiving set by CZ Design. 

I made a swing card, on the front it says "Grateful for you" and when you open it, it says "Grateful for Pie". So funny. I made the pie from an old punch I had ( before diecutting there were hand punches!). It's a scalloped circle punch and I used a smaller circle die with it, put together it looks like a pie. I used scissors to cut a wedge out of it. The happy thanksgiving sentiment is from the same set. 

I stamped the background with the Simon Says Stamp "Talavera Vine" cling stamp.
 
My second card uses my favorite sentiment from the "Sassy Thankful" set. I chose the stamp that says "Let us give thanks" and there are lots of sentiments to choose from to place underneath. I chose "For elastic waistbands". Perfect. 

The leaves are from a discontinued Simon Says Stamp die, but any leaves will give the same effect.

Here is the link to the Simon Says Stamp STAMPtember release:


Go back to the Simon Says Stamp blog for more links to see what the other party participants have created! Each participant has an offer code, only one code can be used per order but go check out which you'd like to use!


Thanks for looking, I hope you check out the talented designers participating in the blog party!

More cards are on my Instagram @susanbcards


Monday, August 15, 2022

Momenta Scalloped Birds 2 Ways!


This is the beautiful Momenta "Scalloped Birds" die. The die cuts out the scalloped edge and the the sweet scene (on left). I took the birds and branches that were cut out and used them on a 2nd card (on right). Always good to get a 2fer.


I wanted the scalloped edge to be part of the second card so I diecut it again and mounted it to the back of the panel.


Here it is flipped over.

The floral panel is stamped with Momenta's Floral Clear stamp. I used a few shades of Distress Oxide ink on the stamp for a little color variation.

There they are 2 simple, pretty cards, ready for 2 birthdays!


Thanks for looking, I'm on Instagram @susanbcards where I post cards several times a week!


Also used: Momenta Floral Clear Stamp.

Tuesday, August 2, 2022

Momenta Tropical Dies


I splattered and dipped some white cardstock into Distress Inks in Twisted Citron and Mowed Lawn. I diecut the leaf from green cardstock and used the negative space as a stencil with Mowed Lawn ink and a blending tool.


There are 5 different types of tropical leaves in the set. For this card I liked the idea of having a different leaf in the background than the ones I diecut.


For the flowers, I used colored cardstock, saved a bit of time and ink. I took some Distress Oxides and colored the edges and centers to add a bit of dimension. In the photo you can see how the dies cut AND emboss some lines onto the flowers and leaves. If you use a blending tool and a darker shade of ink, it'll make the lines stand out. 


For the 2nd card, I blended the background with Distress Oxide inks. I took a piece of vellum and stamped it and then heat embossed it with white embossing powder. I attached this vellum onto the inked background, hiding the glue under the white embossed flowers.

The Tropical dieset is Momenta #2157733.
The background stamp in the second card is  Momenta #2117117.


Thanks for visiting! I'm also on Instagram @Susanbcards

Monday, July 18, 2022

Momenta Woodgrain Embossing Folder & Wreath Die Set


Today I'm sharing cards using the Momenta "Woodgrain Embossing Folder & Wreath Die" set. It's available at Hobby Lobby. This is a tremendous value as you get 11 pieces (10 floral/leaves dies and the woodgrain embossing folder) for one low price. For the 3 cards I made, I changed the colors for variety. This set would also be great for Christmas cards in white, red and green, just change the sentiment.
For my first card, I embossed gold metallic cardstock with the Woodgrain folder.

I think the key to a nice looking card is adding dimension. I cut the wreath 6x from silver cardstock. This is lightweight foil cardstock so I cut some wreathes from 110 lb white and glued them to the silver. I then started stacking the branches to form the wreath.
No foam tape, just the branches.
Here's 2 flower diecuts. the one on the left is shaped to add dimension, the one on the right is the plain diecut. It's fine to adhere the flat diecuts, I just like it to stand out. I used a shaping tool and a foam mat to curve the petals.

 You can see the how the flowers stand out on the card. I ended up not putting flowers on the gold card, I thought a bow and a sentiment was enough. (I'm not sure who makes the Happy Birthday die it was in my stash, it's very old.)

I used the flowers on the navy card with some leaves cut out of vellum. I gold heat embossed the sentiment on this card, I added 1 layer of the gold wreath to get an idea of where to place the sentiment, then placed the stamp in my stamp positioner and stamped. I did this before adding too many layers of wreath, I was afraid it would be too thick for the stamp to reach the navy cardstock.

For the white card, I painted the leaves and flowers for a country look. I added some small gemstones to the center of the flowers. I stamped the sentiment and diecut it with an old banner die.

You can see there are different ways to add a sentiment. They are all sentiments I had in my stash.

Thanks for looking at my cards, I share many more cards on Instagram @susanbcards.


Tuesday, July 5, 2022

Momenta Geometric Layered Border Dies


I think this Momenta die set is fabulous. The set is called, "Geometric Layered Border Dies" a set of 2 dies that when layered make a beautiful border that fits an A2 size card.


This die cuts a piece that is approximately 5 1/2" x 1 1/4", perfect for a landscape card (top folding). I took some strips of white cardstock I had and ink blended lines on them. You don't have to do that, you could just take 2 different colors of cardstock and diecut each die, layer them and have an equally beautiful card.

Here's a photo of the 2 dies I used, one on white cardstock, the other with the ink cardstock.


Here's what it would look like with solid colored cardstock.
Same pieces just layered differently. I didn't end up making this card, I really liked the ink blended cards.


After I diecut the inked piece and adhered it to the white piece, I decided to make a cute set of cards. I took a white A2 notecard (4.25" x 5.5") and put the HELLO sentiment on my stamp platform, I placed down the diecut just to see where I wanted the HELLO to go, then inked the sentiment with ink that matched my diecut. I stamped the sentiment on 3 cards, then attached the diecuts with glue.

I cut colored cardstock slightly larger than the white notecards and adhered the notecards to the cardstock. I like how the colored mats highlight the colors of ink.

I'll be posting a Reel on Instagram @susanbcards if you'd like to see a quick video of how I inked blended the strips of cardstock.

These cards were fun and easy to make. I love the idea of making sets of cards to give away.
You can find this die set at Hobby Lobby!

Thanks for looking!


Sunday, June 26, 2022

Papertrey Ink June Release!


I am honored to have been invited as a guest designer for the Papertrey Ink June Release! There are so many great products in this release, here are the cards I made.

The toucan is from Feathered Friends 24 die set which includes the palm fronds. The frame is Penciled Outlines stamp and die set, the sentiment is from the Floating By Sentiments stamp set. The stick is from my yard 😂.

My 2nd card is made with the Graceful Butterflies stamp set. I stamped and heat embossed the butterflies, then watercolored them. The background die is the fabulous Lotty Dotty Border Bling die. I strategically placed colorful scraps over the dots and diecut them, placing them into the negative space. I cut several extras so some are stacked. The palm fronds are from the Feathered Friends 24 dieset. The sentiment is from Floating By sentiments, several great sentiments for summertime cards. 

Isn’t the swimming pool adorable? The float toys are from the Floating By stamp set. I love the watermelon, which can also be a lemon or lime slice. 

Now the star of the show is the pool water, created with the Pool Water stencil set. I made a reel showing how I made my background with acetate, alcohol ink placed on top of distress inked cardstock. You can check it out on Instagram. 

This shabby chic card is made with the Vintage Postage Stamp set. I enjoyed making the postage stamps. The sentiments in this set are really sweet. The background letter is made with Crackle Paste and the Script Background Stencil. 

The parrot is from the Feathered Friends Mini 24 stamp set. A very easy to layer set. I paired it with the palm frond from the Feathered Friends dieset. The background is the 
Lotty Dotty, this time I pulled dots of acrylic paint down the paper to create these random lines. 

Visit my Instagram @susanbcards to see my Pool Water reel!

Thanks!

Monday, June 20, 2022

Momenta Layered Icons & Frames Slimline Card


I used 2 sets to make this slimline card. The first is the "Layered Icons & Frames Slimline" die set. This set is a great value, the main piece is this 3-window slimline die, I also used the slimline stitched rectangle, which is shown in the photo above under the windows.Used together they make an elegant focal point. There are a total of 17 pieces in this set, a great value under $20 at Hobby Lobby. The other 15 pieces are squares, circles, etc. Great basics on their own that also fit inside the windows. Here is a photo of some of the other dies, (I didn't take a photo of the 2 circle dies.)


The 2nd set I used is the Momenta "Floral Stems Layered Dies" There are 13 pieces in this set, flowers and stems/leaves. I diecut the leaves and placed these first.
 You can make some lovely bouquets with this set. I cut the flowers from scrap pieces of inked paper. I always save the little scraps, it makes it easier to create a card. 
A tip: using inked paper adds color variation to your diecuts, which looks more interesting than solid cardstock. I sometimes use solid colored cardstock but if I want to kick it up a notch use inked paper. You can see I inked the aqua background paper, too.

I think the 3-window die makes a special card and is a great basic die. You could just put a sentiment one of the windows rather than a diecut, too.

Another idea is to use the same diecut in each of the 3 windows, just change the color, for example a blue butterfly, a yellow butterfly and a pink butterfly.


That's all for now, I hope you like my card! I'm on Instagram @susanbcards where I post several times a week.

Thanks for visiting!

Wednesday, June 8, 2022

A Full Front Shaker Card Using Momenta Birthday Dies


The card on the right is a full front shaker card. It's nice to make these pouches and have them on hand, you can later glue whatever diecuts you want to the front. Here I used the Momenta Happy Birthday dies available at Hobby Lobby.


This is a piece of cardstock cut to 4.25"x5.5". I attached double sided tape to all 4 sides. I cut a piece of cellophane about 1/4" larger on all 4 sides and centered the card onto the cellophane.

Take the backing off 3 sides and attach the cellophane securely. Leave 1 side open to pour the sequins into, then secure the final side.

Here's the filled card. You can keep these on hand and attach diecuts or sentiments as needed!

Here I've attached the balloon frame diecut.