Sunday, May 9, 2021

A remake


 About a year ago, I made a similar card. I had come across a Tim Holtz demo on FB and he showed how you can take an Impresslit, heat emboss it with Distress Glaze and use a Distress Crayon to age it to make it look like ceramic. Since I didn't have an Impresslit, I tried it with the Tim Holtz/Sizzix "Botanical" folder. There are instructions for that card on this blog (May 4,2020). 

I got lost in making it, I think it took me a few hours to get it to where I wanted it. I posted it on Instagram @Susanbcards and later I had a DM from Tim Holtz saying he liked it, would I post how I made it and then he'd share it on his Instagram Story. I read it and actually thought it was a imposter account. So I said something like, "Okay I'll try." You have to understand, I wasn't a huge Instagram poster, I didn't know that much about him at that time, that he is very supportive of makers and often shares their makes. I probably had 300 followers. I had maybe 10 people looking at my blog, which was too time consuming for me, so I rarely posted. Still don't much unless I get a lot of questions on how I made something. .He messaged me again he was so kind and supportive, I then believed it was real. 

I posted the instructions and also posted the card on a few FB paper crafter sites. Over 1000 people have looked at that blog post. For many bloggers that is nothing, but when you have 12 people looking at your posts normally, it's mind boggling. Since that time I have watched every Tim Holtz tutorial at least 2x. I have learned so much and have become so much better at making cards. I watch lots of other tutorials too and it helps me become more creative.

So the backstory on the original card was that I had lost someone close to me and for over a year was in this place I couldn't get out of, not everyday but many days. The pandemic started and the store I worked part time at closed. So many things/people to worry about. I still remember watching that demo and getting the idea to try it with the folder. I put the folder on my desk with the Embossing Glaze so I wouldn't forget. After I finished the panel, I found the clipping that said "she was herself again" and got teary. The key says, "Hope" and the medallion has compass directions on it. The first time I made a card for myself.

Since then, I have been vaccinated and have seen my family and friends again, things are more normal but a bit different too. 

There's a new Distress ink color, Salvaged Patina, it's bright and happy. I decided to make a new card using the new shade. The clipping says, "always reminds me of her." The key has "Journey" engraved on it and I used a clock this time. I aged it using Finnabair Patina Effect Pastes because time has passed and the journey is long but you never forget the people who are part of your journey.

Instructions:

I inked the "Botanical" folder with Antique Linen Distress Ink and using Black Soot Archival ink I stamped the "Reflections" stamp randomly on those same areas. I inserted white Heavyweight Mixed Media paper and ran it through the Big Shot. 
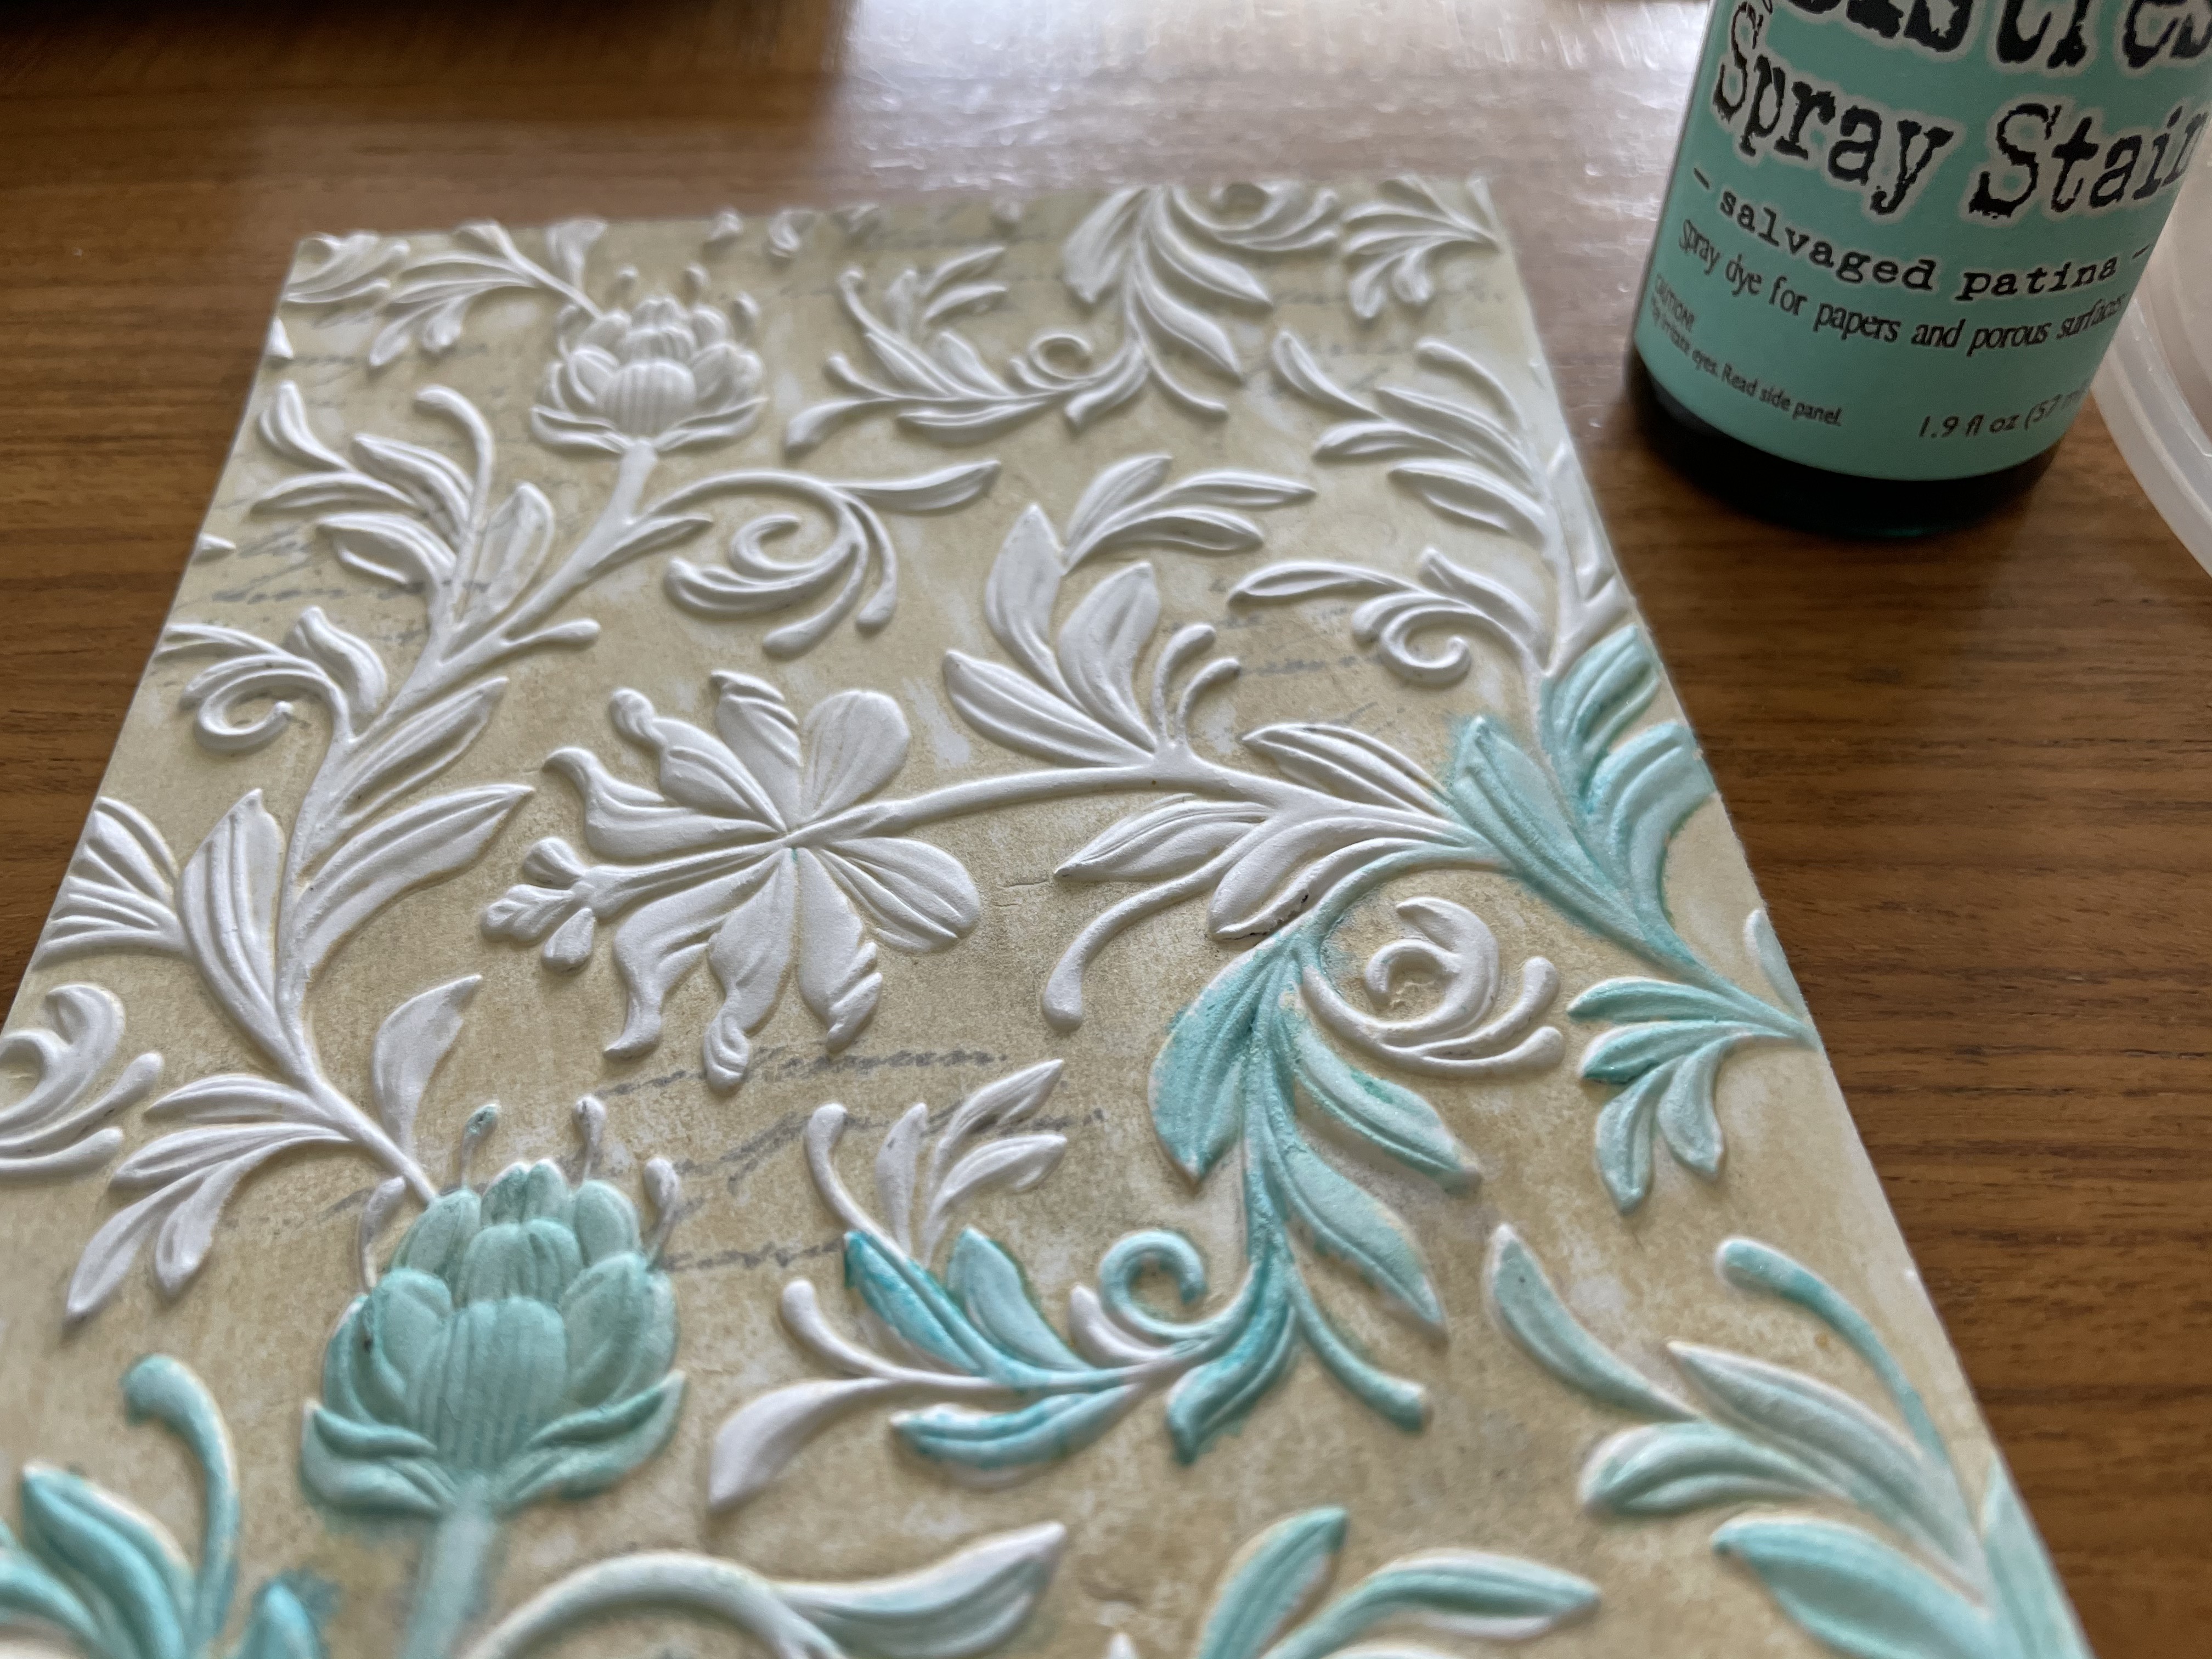
I used the Salvaged Patina Distress Spray Stain like watercolor and painted all the raised areas with a paintbrush.
I used an embossing ink pen and went over all the raised images and poured the Salvaged Patina Embossing Glaze over it  and heated it, a few areas at a time. After it cooled I took the Vintage Photo Distress Crayon and highlighted some of the texture on the florals, used a damp towel to smooth it over. I then ran the Distress Embossing Dabber over the recessed areas, used clear embossing powder and heated it to make it all shine and look like a ceramic tile.
I aged the metal pieces using the Finnabair Patina Effect Paste kit.

That's it. Enjoy your making journey.

Thursday, March 18, 2021

Altenew 3D Embossing Folder


 The Altenew Beautiful Bergenia 3D embossing folder with white pigment ink, 2 ways. The one on the left is purple cardstock embossed in my Big Shot, then I took a white pigment ink pad and rubbed it over the raised areas. 
Here is an example of how I do this, sorry it’s not the same embossed piece, but you get the idea. 

For the card on the right, I used a brayer and rolled the white pigment ink onto the embossing folder. I rolls vertically, horizontally and diagonally just to get ink all over the raised areas on the folder. (Again, not the folder I used for this card but an example.) if you apply ink to the raised areas, after you put it through the Big Shot, it’ll push the ink into the recessed areas of the card.  Here I used the same color cardstock, a purple. 
 
After embossing I took a dark purple ink cube and ran it over the cardstock, the ink will hit the raised areas. I hope this explains how I get all this texture and color on the cardstock. 

Friday, February 26, 2021

Easter Box Basket


Brown cardstock in 7 1/4" x 7 1/4" . Score at 2 inches on all 4 sides (score at 2", turn cardstock, score again at 2", turn again score at 2", turn and score 2") Fold on the score lines.
. Cut up to the first score line and remove a thin piece from the square that touches the rectangle (see photo above). Repeat at the section directly across from it.
t

Place glue in one square, fold that inside and attach to the rectangle, making a corner. Glue all 4 sides so the box looks like this:

At this point you have a box, you can decorate it with printed paper. I took the Tim Holtz/Sizzix 3D embossing folder called "Intertwine" it looks like a weaved basket. I inked the folder with Gathered Twigs and ran a piece of Kraft cardstock through the Big Shot. I cut these pieces to mat my box. My pieces were about 1 7/8" x 3". I lightly inked the edges and embossed areas to make it look woven. I glued these on with Distress Collage Medium, which is a strong adhesive.

For the handle I took a strip of Kraft cardstock cut at 1 1/4" x 10", punched a hole about 1/2" up on both sides. I added a slightly smaller dark brown strip to decorate the handle. I punched holes in the basket about 1/2" down, centered. I then attached the handle with some old flower brads I had. It's always good to use up the old stash!
The bunny is Sizzix/Tim Holtz die called "Carrot Bunny" The candy is Lindt Chocolate Carrots.


Thursday, January 7, 2021

Simon Says Stamp Monday Challenge Designer Spotlight!

I was so incredibly honored to have my vignette chosen for the Designer Spotlight! I worked very hard on this vignette, it was inspired by Paula Cheney's vignette for the Tim Holtz Sizzix holiday release of the Paper Village dies. I changed mine a bit, I added a church with a bell, it was not easy tying that little bitty bell into the steeple. The log house in the upper left corner was inspired by the Tim Holtz FB holiday demo. All the trees are Idea-ology, I learned how to color them on the Tim Holtz FB demos as well. I love the Idea-ology fence on the bottom, I've had that for awhile, I just adore it. The smiling moon is from a Halloween Idea-ology pack, I hate to admit it but I bought the entire pack just for that moon. Now that Christmas is over I think I'm going to hang this up in my home office where I do most of my crafting, some things need to be enjoyed all year around. Visit the Simon Says Stamp blog, every Monday and Wednesday they have challenges! https://www.simonsaysstampblog.com/mondaychallenge/

Saturday, January 2, 2021

Altenew Beautiful Bergenia 3D Embossing

I made a lidded box from cardstock. I took Altenew's Beautiful Bergenia 3D embossing folder and heavy white cardstock, misted the paper with water and ran it through the Big Shot. The texture is breathtaking!
I used a pink ink pad and ran it over the raised areas to add color, a few times to darken the color in a few areas. After dry, I ran a embossing ink pad and a dabber over the entire panel and poured clear embossing powder, heated it with a heat gun and it magically looks like ceramic! I cut pieces to fit the box, attaching it with Distress Collage Medium, the strongest adhesive I know of. The box is pretty strong, perfect for storing small items or even use as a giftbox.

Sunday, December 6, 2020

Reindeer Tag


 I made a few backgrounds on Distress Tags, a great heavy mixed media paper which can withstand a lot of wetting a drying. I first sprayed the tag with Peeled Paint Distress Oxide and Distress Stain Sprays. I took the new Rustic Wilderness Distress Oxide Ink and smooshed it onto my craft mat, sprayed a little water and dipped the tag into it for some darker areas. 

I ended up with the one similar to the one on the left. Good, but needed something. I rewatched Tim Holtz’s FB Demos, one called Beyond Backgrounds where I found a bit of inspiration. I’m sorry I didn’t take photos of what I did, I was just playing around. I took the tag and brushed on Distress Collage Medium, making an effort to get brushstrokes on the surface. After it naturally dried I took Distress Spray Stain in Antiqued Bronze and sprayed the tag and wiped it off the top portion of the tag (see above right) 
There’s a division between the bronze spray and the ink which reminded me of tree tops so I took a Black Soot Distress Crayon and accented this line, rubbing it in with a damp finger. The reindeer is from the Idea-ology Noel ephemera pack, I inked the edge with Walnut Stain Distress Ink. As shown in the demo, I took the Adventure Awaits sentiment chip, ran the embossing Dabber over it and poured Speckled Egg Distress Embossing Glaze over it, heated it and then colored it with Walnut Stain Distress Crayon, rubbing it in and then with a damp cloth cleaned it off a bit. Love that. I also used the Tiny Text sentiments ink in white, heat embossed and trimmed to fit. 

“Not All Who Wander Are Lost” isn’t that the truth.


Thursday, November 19, 2020

Faux Wood Locked Box


When


I first saw the Sizzix/Tim Holtz “Engraved” embossing folder it reminded me of carved wood. This is the idea that came to mind. (I also used the “Lumber” embossing folder the same way) I took a Ground Espresso ink pad and ran it over the raised areas of the embossing folder and a water spritzed piece of Kraft cardstock. This helps to keep the paper from tearing. I ran it through the Big Shot, the ink goes into the recessed areas and really highlights the design. I ran a Rusty Hinge Distress Ink pad over the raised areas. I took the Distress Embossing Dabber (a embossing pad would work) and ran it over the entire thing, then clear heat embossed it. I did this once for the Engraved top and 2x for the Lumber sides. You end up with shiny faux wood.  I could easily see skipping the clear powder if you want a bare wood look but I like the shine and the extra sturdiness the heat embossing provides. 

I made a cute flip top box based on one I saw on YouTube by DaveHax. He makes the coolest “DIY Cardboard Gift Box” watch the video even if you don’t want to hand make a box, you can thank me later😉.  Mine is bigger so I had to use 2 pieces of cardstock  I apologize for the lack of good pics, I’m not good at the blogging thing.


Two pieces of 8x10 Kraft cardstock, on the short side scored at 2” and 6” turn and score at 2” and 8”. Cut the short tabs as seen above, I cut a little wedge off the end tabs so when glued together it fits better. I used wet glue and paper clips to just hold in place. You can used strong tape, but I like glue so I can adjust it as necessary. On the second piece of cardstock, the only difference is you can cut the square tabs off on the long side and just glue the rectangle to the the 1st piece of cardstock to create a flip top.  


Flip top box

I then cut the embossed panels to fit the top and sides of the box, used glue and tape to adhere. The lock and key is by Idea ology Locket Keys, adhered with Distress Collage Medium. The sentiment is from Tim Holtz Tiny Text stamps.


 Faux, faux, faux! Happy Holidays!

Hero Arts Slimline Card


I love this Hero Arts Fancy die, called Joy Ornament. There are 3 of the ornament dies, the other 2 are Love and Cheer. I wanted all 3 but budget constraints, you know. 

This month’s Hero Arts’ challenge was to make a slimline card, my mind started whirling. It only makes sense to make a slimline card if you need the extra space to tell a story. So mine is a faux shaker card with a leak. The stars are at the bottom of the ornament and then a string of stars are falling out. 

I made an alcohol inked Yupo background using Ranger Blending Solution, and alcohol inks in Tranquil Pearl, Denim and Indigo. I let the inks move as they wish using an air tool, then I like to go back with a blotting tool with felt attached, add a few drops of blending solution and pounce over the inks to leave a textured look. I let it dry and then took Martha Stewart Sterling Glitter paste and Tim Holtz’s star stencil and placed the stars where I wanted.


I used the negative space of the diecut to mask off where I didn’t want to stencil, after it dried off I went removed the mask and stencil the stars trailing down from the ornament. 

In other words, Spread Joy!

Susan

Tuesday, November 17, 2020

Thanksgiving cards


I made this card for Instagram - Susanbcards on Instagram and decided I loved it so much I’d make more, something I rarely do. I used a stamping platform and just kept working assembly style.  I decided to heat emboss each of these leaves and after it cooled I used Tim Holtz Distress inks as watercolors and went back to add more color. ( Crackling Campfire, Mustard Seed, Mowed Lawn, Twisted Citron and Evergreen Bough) I used Speckled Egg for the background. The leaves are from Tim Holtz/ Stampers Anonymous “Pressed Foliage”.

I have so many people to send Thanksgiving cards, I’m so thankful for so many people in my life, both family and friends, so many I haven’t been able to see this year. 


Happy Thanksgiving!

Thursday, October 8, 2020


 Pinkfresh Studio makes some beautiful "Essentials Slim Cuts" dies. This one is called "Slim braided circles panel" It's so pretty, the cutouts scream out for florals. I used "Lovely Blossoms" stamps and matching dies.

I watched a movie while I diecut a bunch of these flowers and then put the negative space into my stamp platform, placed the stamps into the negative spaces and stamped the green stems and leaves. Once the stamps are placed you can just keep putting the white diecuts into the negative space and stamp. This makes doing multiples much faster and I just save the stamped images in an envelope and keep it with the stamp/die set. I saw this technique on Jennifer McGuire's blog, she has a video explaining it on YouTube.

I'm entering this card on Pinkfresh Studio's blog for World Cardmaking Day challenge. You should check it out, there's a number of different challenges!

Sunday, August 30, 2020

A "Specimen" treat box

The new Tim Holtz Stamper's Anonymous "Specimen" stamp set screams to be stamped and put into a specimen box. I've made these boxes before, inserting fake flowers or butterflies. This bug is perfect for a Halloween treat box.
I used a piece of 7"x 7" kraft cardstock, 85 lb. Score at 5", turning and scoring at 5" on all 4 sides.


If you've hand made boxes before, this one is simple, if not, I'd tell you to go to Youtube and find a video, it will help. Here I cut a slit in the corner, cutting out a smidge helps when gluing the box together. Cut the corner and turn so you cut the corners as seen above.

The lid is a piece of 5.75" x 5.75" piece of Tim Holtz Idea-ology "Mini Collage" paper it's an 8x8" pad.
I scored it at 1/4" and 1 1/4"all on all 4 sides. I then cut a 3" square out of the center, laid red tape (double sided tape) around the cut out, and attached a piece of clear film cut a smidge smaller than 3" square. This is a regular bakery type box. I then folded and cut the corners as seen above, glued it all together to form a lid.

Here you can see the inside of the lid. I took a piece of 110 lb white cardstock and cut it to 3 1/2" inch square, scored at 1/4" on all 4 sides, cut and glued it together to form a drop where the bug would sit. I sprayed the paper with Distress Oxide spray in Hickory Smoke, Walnut Stain and Vintage Photo before I glued it together to look grundgy for the bug. I put a little bit of glue around the 1/4" edge to attach it to the lid. I stamped the with black archival ink and black heat embossed the bug to give it shine. I fussy cut the bug, inked the edges in black and used a pop dot to give the bug dimension.

 
I attached a specimen ephemera piece from Idea-ology Field Notes Snippets. The Toxiique sign is from Idea-ology Halloween baseboard pack. I didn't attach it, I'm still deciding if I want to put twine around the box, I just though the box needed a little color pop.


Monday, August 10, 2020

MFT Summer School White Space

 Definitely hard for me to leave white space, but this little house die cut from red glitter paper makes for a sweet image. This is from the Snowy Scene Builder Die-Namics from My Favorite Things.

Following the My Favorite Things Summer School 2020 homework for white space.

Saturday, August 8, 2020

A Rainbow Card!

 My Favorite Things Planted Blooms is the perfect die for a rainbow card. I got the idea for the watercolor background from a Kristina Werner post, just quick strokes on watercolor paper. She used a white stamped image but I thought it was perfect for a rainbow card, a homework assignment from My Favorite Things Summer School. I always love a good challenge.