Sunday, April 17, 2022

Momenta Birthday Shaker Dome Cutting Dies


Hello! Today I'm sharing 3 birthday cards, 2 using the shaker domes, all 3 using the Momenta Birthday Shaker Cutting dies. I also used the "Kumiko Geometric" clear stamp for the background panel on all 3 cards, heat embossing the pattern onto cardstock. The card on the left is gold heat embossed on pink cardstock. The 2 on the right are white heat embossed on white cardstock, then I blended Distress Oxide inks for the color.


To Make the Shaker Dome:


Using the scallop die, cut the base for the shaker.


Decorate the base as desired. I used dies included in the set and adhered with liquid glue. Add whatever shaker pieces you want, sequins, gems, or cut confetti pieces. This set includes dies to make sprinkles and stars. The dome is pictured above and has self stick adhesive on it. Peel the backing off and center it over the scallop base.
In the set there is a circle die. If you place it inside the scallop die you can cut out a scallop frame. This will go over the dome, glue in place to cover the edge of the dome.


I adhered the dome onto the inked panel, matted it in pink, then adhered that onto a white card base.


You can buy additional domes seperately.


Some Momenta products are available at: 


I made a card without the shaker dome.


I used the same dies and cut a window onto the front of the card, framed it and put a decoration inside. 

Included in the set are 12 die pieces: a scallop, a circle, the words-Happy, Birthday and Wish. A confetti die, a cupcake and outline, small banner, balloon, party hat, and streamer. Also included are 2 shaker domes.

That's it for today, I hope you enjoyed seeing this fun set of cards! 

I can also be found on Instagram @Susanbcards


Monday, April 11, 2022

Spring Tim Holtz/ Sizzix Paper Village


I made a winter scene (12/13/21 blog post) and always had in my head that I'd create a scene for Spring/Summer where the flowers are blooming.

I used Tim Holtz/Sizzix Paper Village house dies and trimmed down the depth of the house as it stuck out too far from the card. If you want to see how I did that, I have instructions on the 12/13 blog post HERE.

For this card, I used the Flower Field die for behind the house, colored in Saltwater Taffy and 
Scattered Straw. The background of the card is in Salvaged Patina, such a pretty soft shade.

The flowers are from a number of Tim Holtz/Sizzix sets: Funky Foliage, Tattered Florals and Garden Greens. I really like to scene build with dies, I have a box full of inked papers and scraps to diecut.

The sentiment is from Tiny Text by Tim Holtz for Stampers Anonymous.

The panel is mounted on a 6x6" card.


This is the original winter scene.


Wednesday, April 6, 2022

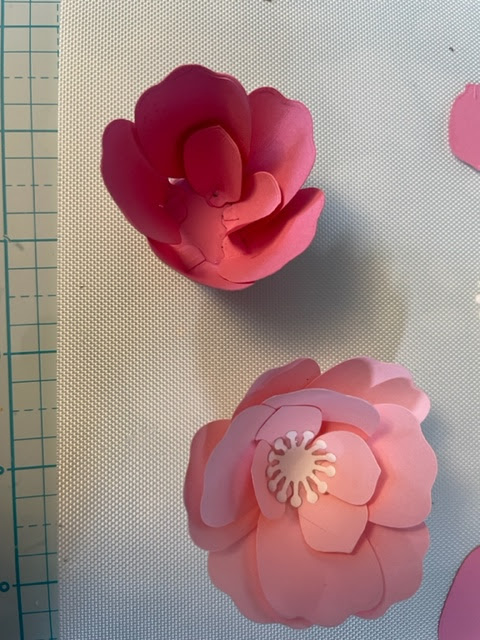
Momenta Build a Bouquet


Momenta Build a Bouquet dies are sold at Hobby Lobby. I made these flowers with colored printer paper, which is lightweight enough to easily form the flowers. 


Sunday, April 3, 2022

Momenta Dimensional Floral Dies Build a Bouquet #2157691

Hello! Today I'm sharing a dimensional card I made using Momenta Products, perfect for Easter or Mother's Day or anyone who loves flowers.

I am now a Brand Ambassador for Momenta! Their products are well made and reasonably priced.  This set can be found at Hobby Lobby.


I made all these flowers using this set, you can change the look by changing the way you attach the petals. The peach rose in the center is made using colored copier paper and omitting the stamen, instead making a small tube using the small petals and loosely attaching additional petals.

It's easiest to adhere these using hot glue because it's quick dry. If you use regular glue you have to hold it in place for a few seconds and then you end up with glue on your fingers. I used to make flowers like this but much larger for display windows at a store I worked at, so I have this down.

These are the pieces used to make a flower. I diecut the large and small petals 2x, the large circle once, and the stamen once. Colored printer paper weight is the best, the kind people use to print flyers. Here I used 65 lb cardstock but it's harder to shape the petals. The circle is the base, I always use a piece of scrap cardstock in a close shade, once the petals are glued on, you can't really see it.


I shaped the petals by lightly rolling the petal around a pencil.


Fold up the tabs at the bottom of the petal, a dab of glue to attach the tabs together to keep the petal shape. Another dab of glue under the tab to attach it to the circle.

Attach the larger petals to the outer edge of the circle first, then attach smaller ones in the center. It doesn't have to be perfect, it looks more natural if they are slightly off anyway.

Glue the white stamen in the center.


The outside packaging of the Momenta Dies #2157691. I always cut magnetic sheets to organize my die sets (not included), here are the 10 pieces included in the set.


If you're interested in making the envelope card (using an envelope punch board), you can find it on mixedupcraft.com 

The beautiful printed paper I used to decorate the card is by Momenta #1381573

That's it for today!

I'll be back soon to share more ideas, I can also be found on Instagram @Susanbcards where I post several times a week.


Wednesday, March 30, 2022

Poppystamps Challenge Pretty Papers


This month’s Poppystamps Challenge is use pretty papers. I chose this plaid from my stash. I used the large Thanks sentiment, die cutting it 2x in black, once in plaid for dimension and the outline in black. 

I diecut the Whittle Scottie from black cardstock and tied a bit of bakery twine around his neck. 


Thursday, March 24, 2022

Memory Box Challenge: Miss You


I just love this Memory Box Emboss and Cut, called Domed Window, I purchased it at Simon Says Stamp. It embosses the window frame and die cuts the wondow panes in one pass. That way you can insert anything you want into the diecuts like I did. 

I first took a piece of cardstock (about the size of the window) and blended some Distress Oxide inks onto it. Colors used were: Villainous Potion, Prize Ribbon, Broken China, Saltwater Taffy and Ripe Persimmon. I stamped the trees in black ink, splattered a bit of white acrylic and lightly smeared a bit of white pigment ink to look like a starry night. I then diecut the window panes.

I ran a piece of gray cardstock through with the Domed Window and it embossed the window frame onto the paper and diecut the panes again. I wanted the frame to be white, so I embossed a piece of white cardstock and fussy cut the frame out and glued it over the gray frame. 

I then inserted the window panes into the window. I just love this image. It reminds me of looking out the window seeing the sunset and missing someone very dear.

This is for the Memory Box Challenge, Miss You/Thinking of You for the month of March 2022.

Thank you for looking. I can also be found on Instagram @susanbcards


Wednesday, March 23, 2022

Altenew Peruvian Lily


I love a challenge, this month's Altewnew Inspiration Challenge has an unusual color combination for me.


I used the beautiful Peruvian Lily layering dies. I had some cardstock in yellow, white and gray but needed to color some for the leaves using Distress Crushed Olive and water. For the background and a layer of the flower I used Distress Shaded Lilac.

I took the Shaded Lilac ink pad and just swiped it across the paper, then misted it with water and moved it with a paintbrush. After dry, I dipped it in more ink for the splatters. It looked like water horizontally, vertically it looked too much like the inspiration photo, it should be inspiration not an exact copy! I wondered what it would look like embossed, so I used the Angled Mosaic folder and ran it through the Big Shot. Wow! I loved it, just the right amount of color variation and the embossing added so much texture. I'll have to remember to do this again.

To finish the card I diecut the Fancy Thanks sentiment , splattered the card with a bit of acrylic paint, attached a few waterdrops and mounted it on a card.


This lily is so beautiful but Altenew makes so many beautiful flower dies and stamps. And of course, they make some of my favorite embossing folders.

Here is a link to their challenge this month: 

https://blog.altenew.com/white-on-white-embossing-card-project/


Thank you for looking! I can be found on Instagram @susanbcards

Monday, March 14, 2022

Momenta Lemons and Blossoms

I made these 3 cards using the Momenta Lemon die set.
Here are the dies included in this set. You can see the solid dies emboss texture and diecuts the shapes.
I used watercolor paper because it has a similar bumpy texture as a real lemon. I sprayed the paper with Squeezed Lemonade Distress Spray Stain and Mustard Seed Distress Oxide Spray and misted it with water to get a variation of color and some water spots.

I cut the leaves from paper colored with Mowed Lawn and Twisted Citron Distress inks. There is a layering leaf die to give the leaves some dimension, a nice touch.
I used a stylus and a foam pad to give some shape and dimension to all the blossoms, the buds and leaves.

I attached all the leaves, buds and blossoms with glue. I only added glue to part of the diecuts, for example, on the blossoms only the center of the flowers, letting the petals pop up. On the lemons I used some foam to the back.


I used the Momenta printed cardstock for the backgrounds on the cards with lemons. The pad has 48 sheets of paper that looks inked, some have gold metallic accents. I usually ink my own backgrounds but this made it easy and just as beautiful. I added a few gemstones to the cards.


For my last card the flowers and leaves look beautiful on their own. I took the slimline die with the embossing plate included with my machine, I used the die to emboss the cardstock. It left a raised impression but didn't cut the paper. I then placed the die back onto the cardstock (easy to line up since it's raised.) I used low tack tape to keep it in place and partially die cut the embossed panel, first on one end, then turned it to partially die cut the other end. 
To partially diecut, you place everything down on the machine as for regular diecutting but  the top plate is only placed where you want to cut. As you can see above, the blue top plate is only placed over the bottom of the paper so when it is run through this is where it will  cut. I turned this around and repeated it on the other end. 

I attached the leaves and flowers just as I had done on the first 2 cards.

The lemons make me think of Spring!

I can be found on Instagram, Facebook and Pinterest as Susanbcards

Thanks!
Susan


Tuesday, March 8, 2022

Funkie Junkie Boutique Blog Guest Designer!


I am very honored to be a Guest Designer on the Funkie Junkie Boutique Blog! I was a January Challenge Winner for "Out With the Old, In With the New". Their challenges are great fun and a randomly selected entrant gets a $25 gift certificate to the Funkie Junkie Boutique, while the winner of the challenge is invited to be a Guest Designer. 


Today I'm sharing a home decor piece that started out as a card but continued to grow until it fit on the back of a Tim Holtz Vignette Box.


I took some Distress Mixed Media Heavystock and sprayed it with Distress Stains in Rusty Hinge, Antique Linen, Vintage Photo, Gathered Twigs and a bit of Ground Espresso.
This is the new Tim Holtz/Sizzix Woodgrain die, I think it's so cool, I wanted to use it on this project. I imagined a wooden planter, filled with flowers and leaves.
I made 3 of the panels, 2 for the horizontal planks, 1 cut to make the side planks and glued it together.

I cut another piece of Distress Heavy stock to 6"x11" and Sprayed it with Distress and Distress Oxides and then randomly stamped some script and florals in Hickory Smoke for some interest and texture.

I always have inked paper on hand, I throw them into a shoebox. I grabbed a bunch of colors I thought would look good for the flowers. I even had some of the new Distress ink in Saltwater Taffy (the flowers on the left). The dies are all Tim Holtz/Sizzix. After diecutting I used a shaping tool to give the flowers dimension. I think this makes a huge difference. The dragonfly, ladybug and the Impresslit butterfly were in my stash, ready to go. I've made it my New Year's resolution to use up all those extras!


That's it! I hope you like it. Please visit the Funkie Junkie Boutique Blog, there's some great inspiration from the talented Design Team and enter the challenge!

Thank you to the Design Team for inviting me as a Guest! And thank you for looking at my project. It was such fun to make.

I'm also on Instagram @susanbcards where I post several times a week.